
 Good morning, I am a little behind getting this card posted as it was from Stamp Club earlier this month. I know that doing Valentine's Day Cards in December seems a bit early and I would tend to agree but this set is only available for a short time and I wanted to make sure and use all the stamps in the set. Which meant Valentine's Day in December. The set is Festive and Fun and is only available until January 3rd. We stamped it with Basic Gray Classic Ink and then used the Aquapainters to add some color. The colors on the card are Real Red, Pretty in Pink and Regal Rose. I couldn't resist using the Real Red and Whisper white Glimmer Paper to make heart accents with the Heart to Heart Punch. We also used the Scallop Trim Border Punch. The heart and dot piece behind the main image is the Heart Pressed Letterpress Plate. It is so easy to use with our Craft Stampin' Spots. For ours we used the Real Red Craft Stampin' Spot. I like how you can customize the color to suit your card. If you would like to purchase this set contact me or you can order line. Don't forget to take a look at the Clearance Section online. There are a lot of great deals there including the Black Whale handle style punchs that Stampin'Up! used to carry. All the clearance items are while supplies last so don't hesitate to place your order. Thanks for stopping by again today and have a great day! Tonya
Thursday, December 22, 2011
Be My Valentine!
Good morning, I am a little behind getting this card posted as it was from Stamp Club earlier this month. I know that doing Valentine's Day Cards in December seems a bit early and I would tend to agree but this set is only available for a short time and I wanted to make sure and use all the stamps in the set. Which meant Valentine's Day in December. The set is Festive and Fun and is only available until January 3rd. We stamped it with Basic Gray Classic Ink and then used the Aquapainters to add some color. The colors on the card are Real Red, Pretty in Pink and Regal Rose. I couldn't resist using the Real Red and Whisper white Glimmer Paper to make heart accents with the Heart to Heart Punch. We also used the Scallop Trim Border Punch. The heart and dot piece behind the main image is the Heart Pressed Letterpress Plate. It is so easy to use with our Craft Stampin' Spots. For ours we used the Real Red Craft Stampin' Spot. I like how you can customize the color to suit your card. If you would like to purchase this set contact me or you can order line. Don't forget to take a look at the Clearance Section online. There are a lot of great deals there including the Black Whale handle style punchs that Stampin'Up! used to carry. All the clearance items are while supplies last so don't hesitate to place your order. Thanks for stopping by again today and have a great day! TonyaStocking Punch Update
Good morning! I wanted to give you a quick update from Stampin'Up! They have let us know that the Stocking Punch in the Holiday Mini will not be carried over to the next Catalog and it will only be available while supplies last. If you were waiting to order it please do not hesitate and contact me soon to place your order. This is a very versatile punch and is a lot of fun to use and have. I will post later today. Have a great day and take a look at your Holiday Mini before it ends on January 4th. Thanks, Tonya
Friday, December 16, 2011
Tags for Christmas

Good evening, sorry for the delay in getting a new project up. I can't believe how busy this week has been. Tonight I want to share with you the tags we made this week at club. They are made with the Peek-a-Boo Die in the Holiday Mini and the Tags Til Christmas Stamp Set. We used Cherry Cobbler, Early Espresso, Always Artichoke and Whisper White for our tags. They all have either Cherry Cobbler, Early Espresso and Whisper White Baker's Twine to tie them to your packages. The Do not Open til Christmas as a bell added. If you have any questions about the tags please leave a comment and I will be happy to answer them. Thanks for stopping by. I am going to keep this short as I still have projects to complete. Have a great weekend, Tonya
Thursday, December 15, 2011
Clearance Rack
Wednesday, December 14, 2011
Digital Downloads
I didn't get a chance to update the new Digital Downloads yesterday so I will fix that today. If you would like to take a look they can be found here. There is a new mustache set and since they are the are hot right now be sure and take a look. Thanks, Tonya
Saturday, December 10, 2011
Wisteria Teddy Bear

Hello and welcome to the weekend! We are planning on doing some decorating today at our house. Not sure how much we will get done but maybe a tree or two. The little bear that I am sharing with you is actually a case from one that was on Shelli's Blog a while back. I have been wanting to make one but just kept putting the project off. Well after making this one and seeing just how easy they are to make I am ready to make more. He is a small bear just about 3 inches tall but oh so cute. He is made with three different sizes of scallop circle dies and our Flirtatious Designer Fabric. He has brads for his eyes and nose and Whisper White Taffeta Ribbon for his bow. Each scallop circle is hand sewn and stuffed with polyfill or cotton balls then the pieces are hot glued together. If you are interested in making these let me know and I will be happy to show you. Going to keep this quick today so we can get as much as possible done today. Thanks for stopping by and have a great weekend. Tonya
Friday, December 9, 2011
Snowman Gift Bag

Happy Friday! I am so looking forward to the weekend! It is going to be a busy one. My kids and I are taking part in our Church Annual Living Nativity both tonight and tomorrow. It is a ten scene drive thru that will involve lots of people and live animals too. The kids are excited and so am I!
Today I have a quick and easy gift bag to share with you. I am always in need of gift bags and love when I can make them myself. This one uses a brown paper lunch sack. I punched a hole in the top for a handle with the Wide Oval Punch then stamped snowflakes across the bag with Whisper White Craft Ink and the Serene Snowflake Stamp Set. I added Whisper White Card Stock along the bottom for snow but first I tore the top edge and added Mica Flakes with Tombow Multipurpose glue. It really holds the Mica Flakes in place. To make the snowman and present I used punches. The present is made with the 1" Square Punch and the Blossom Bouquet Triple Lyaer Punch. The Snowman is made with the 1 3/4", 1 3/8" and 1" Circle Punchs, 1" Square Punch, Word Window Punch, Snowflake Punch and the Bird Builder Punch. I added the buttons, eyes and mouth with the Basic Black Stampin' Write Marker. My snowman looked a little cold so I added a scarf made with the Marina Mist 1/8" Taffeta Ribbon. Now I just need a gift to add inside. I must admit I have not done any shopping this year and I really need to get busy before I can't find what I need.
Well, I am off to start decorating the house. Have a great weekend and Thanks for stopping by! Tonya
Wednesday, December 7, 2011
Grunge Birthday!
 Hello and good afternoon! Thanks to everyone that has stopped by the Blog Hop and left comments. I enjoy hearing from you. Today I have a birthday card that I recently gave my youngest brother. I struggle with guy cards as I feel like they are start to look the same and even though I don't think the guys in my life compare them I know. For this one I used Soft Suede, Very Vanilla and Cajun Craze, Not Quite Navy Card Stock, Not Quite Navy, Soft Suede, Cajun Craze Classic Ink Pads, Versamark, Well Worn Designer Series Paper, Bring on the Cake Stamp Set and the Extreme Elements Stamp Set. The layout is similar to one that I saw in the Catalog. It had been a few days since I had stamped anything new and casing a layout from the Catalog tends to help get the ideas flowing again.
Going to keep this short today. I have a lot to do and the day is quickly passing by. Thanks for stopping by, Tonya
Tuesday, December 6, 2011
All Things Stampin'Up! All Holiday Blog Hop
Hello and Welcome to the All Things Stampin'Up! All Things Holiday! I am so excited to share today's project with you. I made a tic-tac-toe board for Christmas. I got the idea from one that my family had growing up. Ours was Halloween and made just out of felt but we really enjoyed playing it. When I received the Stocking Die Accents I decided they would be the perfect size. I started with a board that was made out of Candy Cane Christmas Designer Fabric. I used two layers with batting between. I used a pink felt and the Tasteful Trim Die to make the board squares. I sewed the felt scallops on with my sewing machine.

The ornaments and trees were also cut out of felt. I glued two layers together with the Tombow Multipurpose Glue so they were a little strudier, then decorate them with more felt accents made with the Tasteful Trim Die and Dazzling Details. There is a close up below and of course you can add more accents if you want but for me I thought I would keep them simple.
Then because I wanted it all to be easy to store I added ribbon to the back and I am able to roll it all up and all the pieces stay inside ready for the next round of tic-tac-toe.
I had the chance to make a card that my oldest son and I had sketched out the other day so I wanted to share it with you today too! He is inspired by return address labels that we received from our Insurance Agent and we thought I matching card would be perfect. The supplies I used are Real Red Card Stock and Classic Ink Pad, Whisper White, Basic Black, Pumpkin Pie, Pool Party, Pear Pizzazz, and Garden Green Card Stock, Serene Snowflake and Teeny Tiny Wishes Stamp Sets, Big Shot, Scallop Oval Frame, Snow Burst Textured Embossing Folder, Modern Label Punch, Heart to Heart Punch, Itty Bitty Shapes Circle, 1 3/4" Circle Punch, Owl Builder Punch, and Blossom Petals Builder. Thank you for stopping by today and now I will send you on your way to the next stop which is Chelsea Malouf I hope you enjoy the hop!

The ornaments and trees were also cut out of felt. I glued two layers together with the Tombow Multipurpose Glue so they were a little strudier, then decorate them with more felt accents made with the Tasteful Trim Die and Dazzling Details. There is a close up below and of course you can add more accents if you want but for me I thought I would keep them simple.
Then because I wanted it all to be easy to store I added ribbon to the back and I am able to roll it all up and all the pieces stay inside ready for the next round of tic-tac-toe.
I had the chance to make a card that my oldest son and I had sketched out the other day so I wanted to share it with you today too! He is inspired by return address labels that we received from our Insurance Agent and we thought I matching card would be perfect. The supplies I used are Real Red Card Stock and Classic Ink Pad, Whisper White, Basic Black, Pumpkin Pie, Pool Party, Pear Pizzazz, and Garden Green Card Stock, Serene Snowflake and Teeny Tiny Wishes Stamp Sets, Big Shot, Scallop Oval Frame, Snow Burst Textured Embossing Folder, Modern Label Punch, Heart to Heart Punch, Itty Bitty Shapes Circle, 1 3/4" Circle Punch, Owl Builder Punch, and Blossom Petals Builder.
Thank you for stopping by today and now I will send you on your way to the next stop which is Chelsea Malouf I hope you enjoy the hop!Wednesday, November 30, 2011
Gift Wrap Made Easy
The sun is shining today which means I was able to get pictures taken of my newest project. I made a quick and easy gift bag out of the Deck the Halls Designer Series Fabric that is on sale until the end of today for only $3.98. That is 60% off the regular price. Also included is the Candy Cane Christmas Designer Fabric for the same price. The Sweet Stitches and Springtime Vintage Designer Fabrics are 50% off.
 To make the bag I simply cut a rectangle that would go around my item to be wrapped. In this case it is a bottle but it could be anything (bread, cookies, or even numchucks that my 13 year old want to put in the bag) If you want to decorate the front I would recommend doing so before you sew your bag across the bottom and sides or you could add it later but it is more challenging. Ask me how I know? For the front of the back I used the Perfect Pennants Die to cut out the tree. There are three different sizes of triangles on the die so you can make several sizes of trees. I used the largest one. I added Chantilly Crochet Trim to the tree and a Chocolate Chip Scallop Ribbon tree trunk and stitched it to a off white piece of fabric. I added a More Mustard Button from the Regals Designer Buttons to the top of my tree. I then stitched the piece to my Cherry Cobbler fabric before adding the Cherry Cobbler Satin ribbon that was stitched by hand to cover the edges. Now to finish the bag fold your fabric in half with right sides together and stitch along the bottom and side. I then folded the top edge down and stitched it in place to give it a clean finished edge. For this bag I tied it shut with more Chantilly Crochet Trim but you can use any ribbon you like.

 To make the bag I simply cut a rectangle that would go around my item to be wrapped. In this case it is a bottle but it could be anything (bread, cookies, or even numchucks that my 13 year old want to put in the bag) If you want to decorate the front I would recommend doing so before you sew your bag across the bottom and sides or you could add it later but it is more challenging. Ask me how I know? For the front of the back I used the Perfect Pennants Die to cut out the tree. There are three different sizes of triangles on the die so you can make several sizes of trees. I used the largest one. I added Chantilly Crochet Trim to the tree and a Chocolate Chip Scallop Ribbon tree trunk and stitched it to a off white piece of fabric. I added a More Mustard Button from the Regals Designer Buttons to the top of my tree. I then stitched the piece to my Cherry Cobbler fabric before adding the Cherry Cobbler Satin ribbon that was stitched by hand to cover the edges. Now to finish the bag fold your fabric in half with right sides together and stitch along the bottom and side. I then folded the top edge down and stitched it in place to give it a clean finished edge. For this bag I tied it shut with more Chantilly Crochet Trim but you can use any ribbon you like.
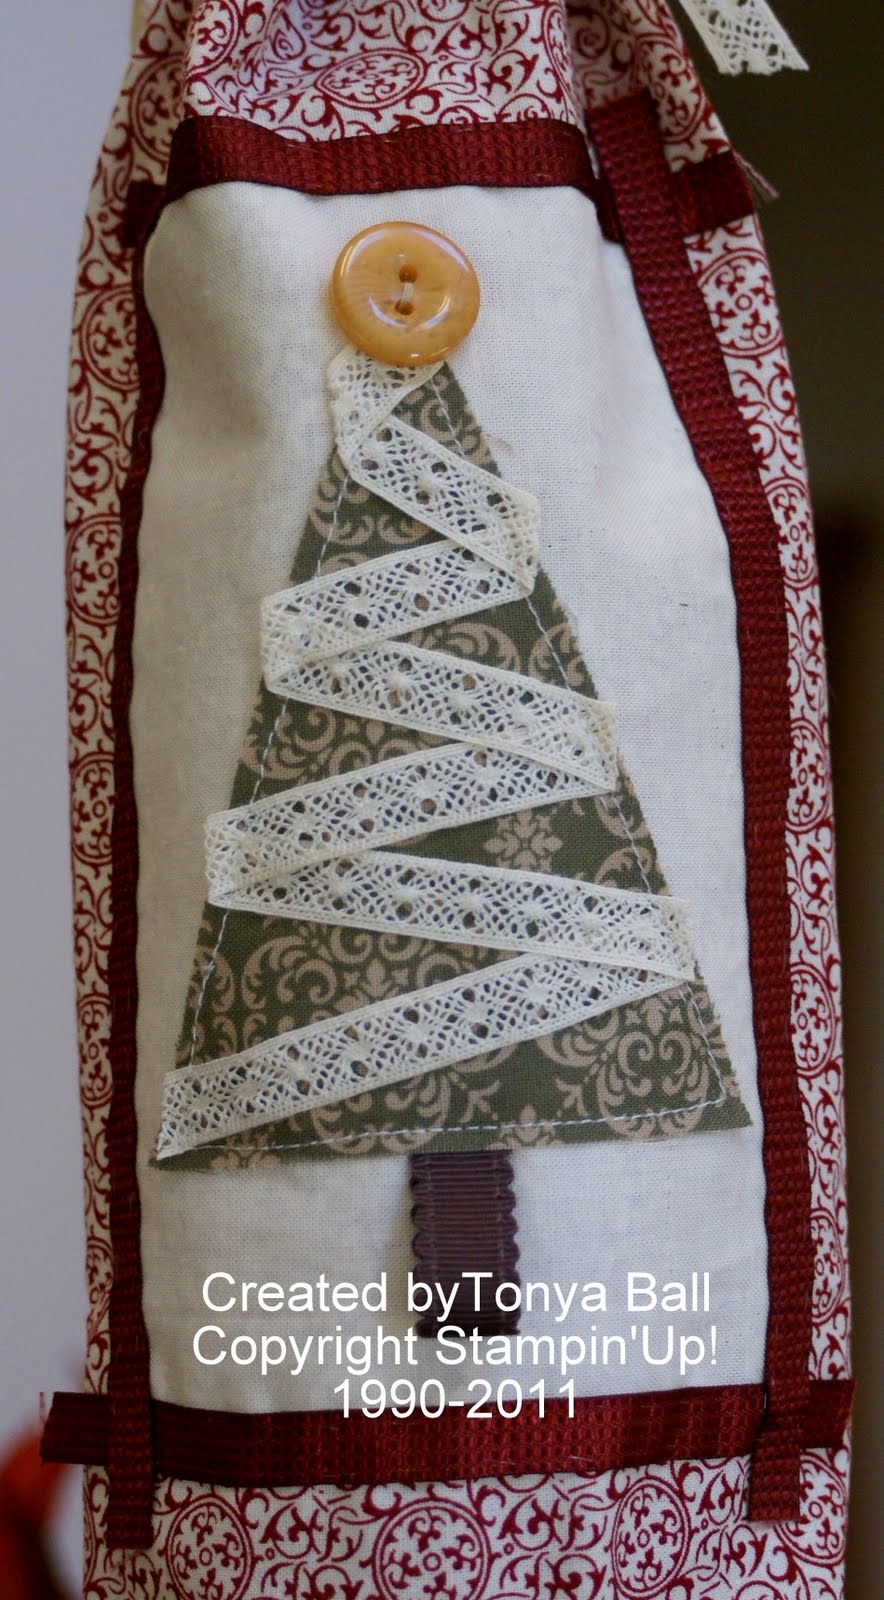
As an after thought I could have used the Cherry Cobbler Scallop Ribbon to edge the front. It is one of the four ribbons included in the 1/2" Scallop Dots Ribbon Bundle along with Basic Black, Chocolate chip and Old Olive for only $22.26 which is 30% off. I will place another order tonight for anyone still wishing to order from the Online Extravaganza all you need to do it call or email me before 11pm. Thanks and have a great day! Tonya
Last day!

Good morning, I will be back later today but for now I wanted to remind you that today is the last day to take advantage of the great Online Extravaganza. There are so many items on sale including the very popular Glitter Brad Bundle. Don't forget about the Designer Series Fabric that is also included in the sale items. I am off to start my day, I hope you have a great one and be sure and check back later for a new sewing project. Thanks, Tonya
Tuesday, November 29, 2011
Gently Falling Cards
Good evening, I have been busy today with a new project but didn't get a chance to take a picture before I lost the light of the day. About a month ago I was asked to make cards for a local church that was having a Women's Retreat. They wanted something to give to each person that attended and thought a bundle of cards would be nice. This is the design I made for them. It is pretty simple which is good as I made 300 of them. The card base is Very Vanilla and I used My Digital Studio to print the Bible Verse on each card. Then I used the Simple Scored to add a couple of score lines right before the Verse. The Stamp Set is Gently Falling and I used More Mustard and Cajun Craze and rock and rolled each leaf before adding the outline stamp in Early Espresso. I did use the Stamp-a-ma-jig just to get it lined up just right. To finish off the card I used the Spritz tool and the Cajun Craze Stampin' Write Marker to spritz each card front. I also made matching envelopes for each card. If you need cards made but don't have time just give me a call and I will be happy to help you out. Thanks for stopping by and I hope you came back tomorrow to see my next project. Tonya

Clean and Simple Birthday Card
Hello again! I have my kids off to school and will be going for a run soon but I wanted to share this card with you that I finished over the weekend. The layout is one that I saw on Shelli's blog and just haven't taken the time to make. The card uses the Easy Events Stamp Set and Just Add Cake Designer Series Paper. The other supplies are Baja Breeze Card Stock and Stamp Pad, Early Espresso Card Stock, Blusing Bride Card Stock and Stamp Pad, Basic Gray Classic Stamp Pad, Whisper White Card Stock, Blender Pen, Scallop Trim Border Punch and the 1 3/8" Square Punch which was used to cut the bottom of the DSP piece. I may go back and add some Dazzling Diamonds to the cupcake but will wait until I decide who to send it too. Some people don't enjoy glitter as much as I do. ;)  Don't forget that time is running out to take advantage of the Online Extravaganza. If you would still like to place an order please give me a call or email me before the sale ends. There are a lot of great items on sale and I hope to be back with a new project that showcases one of them later today. Thanks for stopping by and have a great day! Tonya
 Don't forget that time is running out to take advantage of the Online Extravaganza. If you would still like to place an order please give me a call or email me before the sale ends. There are a lot of great items on sale and I hope to be back with a new project that showcases one of them later today. Thanks for stopping by and have a great day! Tonya
Digital Downloads for November 29th
Good morning, I had planned to post yesterday but the day got away from me so look for two post today not including this one. I will post a new project in just a bit after I take my boys to school, but first I wanted to let you know about the new Digital Downloads that are available starting today. To see them you can head over here. Remember if you want to give My Digital Studio items, such as calendars, cards or scrapbooks for Christmas you need to place your order by December 6 to insure deliver by Christmas. I am off to school but be sure and check back later today for projects. Thanks for stopping by and have a great day, Tonya
Sunday, November 27, 2011
Greeting Card Kids Ornament
Hello and Good evening, I hope you had a wonderful Thanksgiving. Thank you to all of you that stopped by for the All Things Stampin'Up! Blog Hop. It was great to hear from so many of you. Today I want to share with you an ornament that I made with a Window Sheet, Jet Black Stazon and the Greeting Card Kids Stamp Set. I used some other supplies but I will get to those in a bit. First Stamp your image with the Jet Black Stazon onto the Window Sheet. I then flipped the image over and colored it with Permanent Markers. Our Stampin' Write Markers don't work for this process as they don't dry on the Window Sheet. Then I punched out the image with the 2 1/2" Circle Punch and added a thin layer of Crystal Effect on the side that I had stamped the image on. Note this will reverse the image from the orginal so if using a image with words then add the Crystal Effect on the side with the Permanent Marker. I don't add the Crystal Effects to the marker side just because the marker can some time bleed into the Crystal Effects and cause a halo of color around the image. After adding the Crystal Effects I poured Dazzling Diamonds of the still wet Crystal Effects to give the image a glittery snowy appearance. Let the ornament dry overnight. I used the 1/16" Handheld Punch to add a hole into the top and thread a piece of thin rope or twine through. I then rolled the Window Sheet and pushed it through the opening of the glass ornament holding onto the twine at the top of the ornament. I secured the ends on the outside of the ornament to keep the image upright and then added the top back onto the ornament so it could be added to the tree. Your ornament can be personalized with a name or date. I hope you enjoyed this ornament. Let me know if you have any questions or would like more info. Thanks for stopping by tonight and I will have a new post for tomorrow. Tonya

Thursday, November 24, 2011
Happy Thanksgiving!
Good morning, I just wanted to take a moment to wish you a Happy Thanksgiving. I hope you get to spend your day with Family and Friends enjoying time together. Part of my family is off to run shortly in the Annual Turker Trot that our YMCA hosts every year, then we will have dinner with family and most likely eat way to much. :) Thank you for being such wonderful customers and friends and thanks for stopping by, Tonya
Tuesday, November 22, 2011
All Things Stampin'UP! Blog Hop
 Hello and welcome to the first All Things Stampin'Up! Blog Hop. This month we are focusing on Thanksgiving. Be sure and check out all the other ladies that are participating in the Blog Hop and remember to check back next month when we are going to be featuring Christmas. Now for my projects:
The first one is a cute little treat container that you can use as a place setting for your Thanksgiving table or that you can simple give out to everyone that attends your dinner. I used the Candy Wrapper Bigz L Die which is currently 20% off on the Online Extravaganze Sale. Other supplies are: Spice Cake Designer Series Paper, Pool Party Ruffled Ribbon, Chantilly 1/2" Crochet Trim, Word Window Punch, Modern Label Punch, More Mustard Card Stock, Very Vanilla Card Stock, Soft Suede Card Stock, Whisper White Baker's Twine, Soft Suede Classic Ink Pad (for Sponging), More Mustard Classic Ink Pad, Teeny Tiny Wishes Stamp Set, Leaves #2 Orginals Die and Spider Web Textured Impressions Embossing Folder.

My second project using a technique I haven't played with in a while which is Faux Mother of Pearl. I have added a second picture below without the flash just so you can see it a little better. Supplies include: Crumb Cake Card Stock, Cajun Craze Card Stock, Glossy White Card Stock, Very Vanilla Card Stock, Versamark, Soft Suede Classic Ink Pad, Cajun Craze Classic Ink Pad, More Mustard Classic Ink Pad, Cherry Cobbler Classic Ink Pad, Soft Suede Taffeta Ribbon, Scallop Edge Border Punch, Gold Embossing Powder, Heat Tool, Champagne Mist Shimmer Paint, Blender Pen, Hand-Penned Stamp Set, and Gently Falling Stamp Set.
 I hope you enjoy the blog hop and if you have any questions feel free to leave me a comment. I would love to hear from you. There are 12 stops on the Blog Hop so please take a moment to visit them all. Next on your stop if Chelsea Malouf. Thanks for stopping by, Tonya
Monday, November 21, 2011
Online Extravaganza Starts Today!

Today is the start of the Online Extravaganza but the you don't have to order online to take advantage of the great deals. I will be placing an order tonight at 11pm so if you would like to order an of the specials just contact me today. There are two items that are only on sale today and are 20% Off – November 21 Only! 122334 Simply Scored™ was $29.95 for today only is $23.96 and 125152 Sweet Pressed Cookie Stamps was $16.95 for today only is $13.56. I have both of these items so if you have any questions please let me know.
The other items are on sale until November 30, they include fabric, Candy Wrapper Die for the Big Shot, Scallop Dots Ribbon Bundle, Stamp Sets and so much more. To see a complete list and to start shopping you can check out my Website. I will also try and get a complete list posted here later today. Thanks for stopping by and have a great day, Tonya
Friday, November 18, 2011
Online Extravaganza
 I have exciting news to share today with all of you! Stampin'Up! is once again having it's annual Online Extravagana sale to kick off the holiday shopping season, it will begin Monday, November 21, 2011, and run through Wednesday, November 30, 2011.
While this promotion is perfect for online orders during an especially busy time of year, sale prices will be available on all order types.
To order you can log in to my online store Tonya's Online Store on Monday, November 21, to take advantage of great savings, like FREE digital downloads valued at $40 when you buy My Digital Studio Express, 60 percent off select Designer Fabrics, and 30 percent off an exclusive ribbon bundle!
In addition, there will be two items on sale for 24 hours only (November 21, 12:01 AM - 11:59 PM [MT])-so make sure you don't miss the first 24 hours of Online Extravaganza!
I will send out an email with all the sale details on Monday as soon they the items are announced. I am looking forward to stocking up on fabric as I have an idea in mind that not only uses fabric but also I new item from the upcoming Occasions Mini. :)
Thanks for stopping by and I will try very hard to stamp today if not I am going to stamp over the weekend. This week has just been crazy with so many kids activities. Have a great Friday! Tonya
Wednesday, November 16, 2011
Gift Card Holder

Good morning, sorry for not getting back to you yesterday. I had 300 cards to finish up for this weekend and I decided to just get busy and get them all done. I am happy to have them finished and even happier with the
way they turned out. I will show them to you at a later date as they are an order for a Women's Group and I want them to give them out first. Today I want to share with you a stocking we did at club last week. It is very similar to the one I showed you last week except when you look inside there is a place of a Gift Card. It was easy to make just by adding another Stocking inside and using the Word Window Punch to make the slot for the gift card to slide into. The most important part is to add you sticky strip to the back with the gift card in place as a guide to show you were to pu t and not put the sticky strip. This stocking has a gift tag on the front so you can hang it on your tree and everyone will know just who it is for. The colors are Cherry Cobbler, Early Espresso and Old Olive. Such a great traditional color combo and the Designer Series Paper is Letters to Santa. Please let me know if you want to order the supplies for this project. They can be ordered online or by contacting me and I will help you place your order.
Well, I have a big to do list today and grocery shopping is one of those activities so I had better run. Have a great day and thanks for stopping by, Tonya
Tuesday, November 15, 2011
Digital Info for November 15

Good morning, what a beautiful day with the sun shining. It is a bit cold right now but it is supposed to warm up! I wanted to give you a few Digital updates for the day and then I will be back later with a post of you. First there are new Digital Downloads available today. To take a look at them simply head over here and see what Stampin'Up! has to offer today. Next if you are planning on giving MDS gifts this year and are going to use the professional printing from Stampin'UP! then you will need to place your order by December 7th to insure delivery by Christmas. There are so many great options for gifts like calendars, journals, and scrapbooks just to name a few that it really does make Christmas gift giving easy.
Finally don't forget that those of you that host in the next two months can choice to order the Season of Favor Digtal CD as one of your hostess items. I have added a picture so you can see just what a fun and useful CD this is. Call me if you would like more information about My Digital Studio and as always thanks for stoppingn by, Tonya
Friday, November 11, 2011
Felt Stocking
 Good morning I am posting early today as it is a busy day with a few trips into town and club again tonight. :) Wednesday when Hannah and Nancy were here for club we were talking about using the Stocking Die on Fabric and Nancy mentioned felt which I had planned to do but had just got busy and forgot about so I decided yesterday was a great day to do it and let me tell you this was a a quick project. It took no time at all to cut the pieces out with the Big Shot, the Holiday Stocking Die and the Stocking Accents. I hand stitched it with a Blanket Stitch using Baker's Twine in no time at all. I added the holly and berries with Crystal Effects and then added the new Dazzling Details to give it a little shimmer and bling. It wasn't quite dry when I took the picture but I think you can see the shimmer to it. The stocking is a great size to add a candy cane, gift card, jewelry or other small item you want to give as a gift. I will add a loop to hanging once the glue dries. They are so quick to cut out and make that you could easily make a bunch while watching tv or like I did while waiting on my kids to finish up practice or get out of school.
 Also don't forget today is the last day to sign up to become a demonstrator and get the Big Shot for free or if you all ready have the Big Shot then you can get $100 worth of other Stampin'Up! merchandise for free. Call me if you are interested and this is also available to prior demonstrators so if you want to sign up again you can.
 a demonstrator and get the Big Shot for free or if you all ready have the Big Shot then you can get $100 worth of other Stampin'Up! merchandise for free. Call me if you are interested and this is also available to prior demonstrators so if you want to sign up again you can.
 Thanks for stopping by today, I had better go and run so I can get ready for my day. Have a great one, Tonya
Thursday, November 10, 2011
Cookie Stamps
Hello  and good evening, I have a little different post for you tonight in that food is involved, cookies to be exact. Stampin'Up! now has Sweet Pressed Cookie Stamps. The set includes a wooden handle and three silicone stamps to press into your cookie dough and recipes. I decided to give them a try this week for Stamp Club and thought I would share the results with you. The first two pictures are the cookies prior to baking. On the first picture you can see the handle and blue silicone which is the snowflake. The other images are the heart and a jack-o-latern. I didn't try either recipe but did use our favorite shortbread recipe and I am happy with the results and they were a hit at both club and with my kids. I will say that these are big cookies, much bigger than I traditionally make but as long as you only have one or maybe two it should be good. I think the next time I will let me kids in on the fun and let them stamp the dough too! I can't have all the fun right. If you are interested in
  a set let me know and I can help you place your order or you can order online. These would make a great gift for that nonstamping person on your list. Thanks for stopping by tonight and I will be back tomorrow
 with a new post for you . See you then, Tonya
 and good evening, I have a little different post for you tonight in that food is involved, cookies to be exact. Stampin'Up! now has Sweet Pressed Cookie Stamps. The set includes a wooden handle and three silicone stamps to press into your cookie dough and recipes. I decided to give them a try this week for Stamp Club and thought I would share the results with you. The first two pictures are the cookies prior to baking. On the first picture you can see the handle and blue silicone which is the snowflake. The other images are the heart and a jack-o-latern. I didn't try either recipe but did use our favorite shortbread recipe and I am happy with the results and they were a hit at both club and with my kids. I will say that these are big cookies, much bigger than I traditionally make but as long as you only have one or maybe two it should be good. I think the next time I will let me kids in on the fun and let them stamp the dough too! I can't have all the fun right. If you are interested in
  a set let me know and I can help you place your order or you can order online. These would make a great gift for that nonstamping person on your list. Thanks for stopping by tonight and I will be back tomorrow
Wednesday, November 9, 2011
Technique Time again!

Wow it has been a while since I have used today's technique and this one uses a new twist on it. The technique is Faux Silk and traditionally you would use tissue paper to stamp on then layer it on a base but while blog surfing I found that Lyssa over on Song of My Heart Stampers did this technique using coffee filters. One thing I really like about the coffee filters is that they are a little sturdier and tend to allow for a little rougher treatment just in case you don't get the filter lined up on your base just the way you want to. :)
The supplies are pretty basic I used two stamp sets, Serene Snowflakes and Perfect Punches, three ink colors: Bashful Blue, Marina Mist and Not Quite Navy. I also used Not Quite Navy Card Stock and Tafetta Ribbon as well as Whisper White and Bashful Blue Card Stock. For the sentiment I used the 1 1/4" Circle Punch, 1 3/8" Circle Punch and the Scallop Circle Punch which is paper pierced on each scallop. This card would be easy to make a bunch of in a short amount of time so if you haven't started your Chistmas Cards yet then be sure and contact me to place your order for supplies. I will be back tomorrow with a new post that will show you are new Cookie Press Stamps. I had so much fun trying them out and look forward to using them again. Thanks for stopping by and have a great day, Tonya
Tuesday, November 8, 2011
Digital Downloads for Novemeber 8
Good evening, I wanted to let you know that there are new Digital Downloads available today. If you would like to see them you can take a look here. Hopefully we will see some sunshine tomorrow so I can take pictures of the new projects that I have completed. With all the rain it is hard to get good pictures. Tomorrow night is Stamp Club and I am looking forward to stamping with everyone. Thanks for stopping by, Tonya
Friday, November 4, 2011
Stocking Card
 Good evening, what a fun week it has been. With Halloween and a Christmas card class in the same week how can it not be fun. On Wednesday I held a Christmas card Class and for an extra project I made each of the ladies that attended one of these Stocking Cards. It was so fun to make with the Stocking Die and a little Designer Series Paper. The Merry Christmas is from the Four the Holiday's Stamp Set and I accented it with a Snowflake punched out with the SnowFlake Punch with a Mini Jingle Bell in the center. The new embossing folder adds just the right amount of texture to the stocking and other than a small part of the heal and toe it covers the front of the card. I will do a picture tutorial next week when there is more light so you can see how the actual card is made.
I am off to do some more stamping. I have 300 cards to make and need to get some more done tonight. Have a great weekend and thanks for stopping by, Tonya
Tuesday, November 1, 2011
New Digital Downloads
Hello, since it is Tuesday there are once again new Digital Downloads available for My Digital Studio. To view them you can click here. If you have any questions about My Digital Studio or how to purchase the Digital Downloads please let me know as I am always happy to help. Also watch this weekend for new Free Digital Downloads. I will have a new project to share soon, just need to get some pictures taken. Thanks for stopping by, Tonya
It's Good to be a Hostess
 Good morning, November is here and while life tends to get busy now until after the first of the year. It is always nice to slow down and spend time with friends and family and a Stampin'Up! workshop is a great way to do that. Stampin'Up! has made it even better from now until December 15th by increasing the hostess benefits. Instead of just the usual $50 worth of free merchandise you receive for a $350 workshop you can now receive an additional $35. This is true for all orders over $350 whether they are workshop orders, customers orders or hostess orders (online orders do not apply) so contact me today while I still have dates available to set up a workshop for you and your friends. We can do fun Christmas projects such as cards, tags, or even gifts for your Christmas list. Thanks for stopping by and have a great day, Tonya
Monday, October 31, 2011
Big Shot Promotion Extended
 Good morning, I have exciting news to share with you this morning. I had planned to tell you today was the last day to take advantage of the Free Big Shot Promotion but Stampin'UP! has decided to extend the promotion until November 11th. So if you would like to become a Stampin'Up! Demonstrator and either get a free Big Shot or $100 worth of free merchandise then please contact me and I will be happy to help you out. Courtney just joined the Stampin'Up! family and ordered her $100 worth of free merchandise. It is so easy to sign up online and you can even customize your kit. Have a great Halloween and I will post again later today.
Sunday, October 30, 2011
Buy Two Simple Sent Kits Get A Free Stamp
 Hello, just wanted to remind you that tomorrow ends the Buy Two Simple Sent Kits- Get a Free Stamp Promotion. If you buy and two Simple Sent Kits found on page 192 or 193 you can pick one of the coordinating Stamps also on page 192 or 193 but remember the offer is only good until the end of October so time is almost over. Contact me soon if you need help placing your order as with tomorrow being Halloween I will be out with my little trick or treaters getting lots of goodies tomorrow night. You can also order online. Thanks for stopping by and have a safe and Happy Halloween!
Friday, October 28, 2011
Serene Greetings

Good morning, I had some time to not only stamp but post. Amazing isn't it! Today's card is one that we did last night at the YWCA's Ladies Night Out. I really enjoyed spending time with all the ladies that attended and teaching them about Stampin'Up! and how to make Christmas cards. There were probably 40 or more ladies there so it was a pretty big event. The card uses Marina Mist, Bashful Blue, Crumb Cake and Not Quite Navy. I really like the color combo and it is pretty quick to make. There are several punches including the Snowflake Punch, Scallop Oval Punch and the Scallop Trim Edge Punch. The ribbon is 1/4" Marina Mist Grosgrain Ribbon. If you would like to make this your Christmas Card give me a call and I will be more than happy to help you with your supply order. Going to keep the post short as it is a busy day at our house. The boys don't have school and Kaylee gets out early plus I have a Halloween costume to cut and sew. :) Have a great day and I will try to post over the weekend as I work on some projects. Thanks for stopping by, Tonya
Tuesday, October 25, 2011
Time is Running Out!

I can't believe how quickly the month is flying by and the opportunity to get a free Big Shot is soon going to be gone. I would love to talk to you about the wonderful opportunity and all that Stampin'Up! has to offer you whether you want to earn and extra income or just get 20% off your own purchases. The kit is customizable so even if you have some of the supplies you can make changes on the stamp sets, ink pads or card stock. Email or call me if you have any questions or if you want to join my team of demonstrators before it is to late.
Wednesday, October 19, 2011
Wedding Invites Anyone!

Good afternoon , I have been busy getting ready for a pasta dinner that we are hosting tomorrow night so not much stamping as been done this week but I haven't shared the Wedding Invites that I recently did for a Swap that I participated in. I love this color combo together. It is so pretty and yes there is shimmer on the front too. I had designed another invite similar to this for a special couple that will be getting married next month but this one is a little different and the best part about a swap I know have lots of samples to share with anyone that is planning a wedding. So whether you want to make your own or hire me to make them for you I can help you with all your wedding needs. Now back to the invite it is Very Vanilla, Early Espresso and Calypso Coral. It is a trfold and has an inside pocket for your RSVP Card and reception info. As for the other supplies, I used the Big Shot and the Elegant Lines Embossing Folder on the smaller panel and the inside pocket. I also used the Perfect Pennants Die for the belly band as well as the Scallop Trim Border Punch. The A is from the Lovely Letters Alphabet Set. Inside I added flowers by stamping the flowers from Vintage Vogue in Calypso Coral Classic Ink on Very Vanilla. Don't worry all the info inside is false as I only have one daughter. My kids thought it was funny that they have a fake sister getting married but I had to put something on the invite ;) If you would like to see more of the wedding invites give me a call and I will be happy to set up a time to meet with you. Until then I had better get back to cleaning and I hope to get my Halloween Decorations out today or tomorrow too. Have a great day and thanks for stopping by, Tonya


Tuesday, October 18, 2011
Tuesday and My Digital Studio Time

Good morning it is Tuesday and there are new Digital Downloads for My Digital Studio. If you haven't tried out my Digital Studio what are you waiting for? It is such a fun program and makes Scrapbooking a breeze. To view today's downloads you can head over to here. I thought I would share a super quick page I completed with My Digital Studio in a matter of just minutes. I take a lot of pictures at my daughter's Cross Country Meets and not just of her but the whole team so I thought I would put together a page of just one race. This is the Varsity Girls race and with the predone layout I was able to just plug in pictures add a few background and mat colors and this page is finished. I could do one of these for every race that day and add a little journalling and be done or I could add ribbon, stamps and all the extras. I can even do a whole season in one book and have it professionally printed so that my daughter will have it to look back on years from now. Let me know if you have any questions or if I can help you with My Digital Studio in anyway. Well, that's it for today. Thanks for stopping by and have a great day, Tonya
Monday, October 17, 2011
Halloween Luminary

Hello and Happy Monday to you! I was going to share this Luminary with you last week but I had forgot to take a picture and just now got to it today. This is one of the projects we did at Patti's workshop over a week ago. Wow the week has flown by. To make this we used the Big Shot and the Fancy Favors Box and cut the box out of Elegant Eggplant 12x12 Card Stock. We then used the 2 1/2" Circle Punch to punch a hole of of the front and back. We used Jet Black Stazon to stamp the Spooky from the Wicked Cool Stamp Set on the Vellum and then sponged a moon on the Vellum using Peach Parfait and Pumpkin Pie Classic Inks. The Vellum was attached to the inside of the box with SNAIL and then we stamped the Bats also from the Wicked Cool Stamp Set across the front with Jet Black Stazon. I need to touch up a few of my bats with the Basic Black Stampin' Wirite Marker but I didn't have it with me at the time I made this sample. These luminaries are so quick and easy to make and would be beautiful for a wedding or other special event. Know remember it is important to use the battery operated tea lights in these so that they don't catch on fire. Let me know if you have any questions and I will be happy to answer them. Also you still have time to get the Big Shot free this month. Contact me to find out how. Thanks for stopping by and have a great day, Tonya
Friday, October 14, 2011
Dark & Dreary Treats

Good morning! It is Friday and we have a home football game tonight that my daughter and I will be there working the concession stand. It is going to be another busy day with lunch at school with two of my boys too. So last week at Patti's workshop we made these little treats for all the little ghouls in your life. They use the new Cellophane Bags that are 1"x 8" and we stamped Spiders with the Jet Black Stazon across the bags. The crow from the Dark & Dreary Stamp Set was stamped in Jet Black Stazon on Daffodil Delight Card Stock before it was punched out and added to a Basic Black Card Stock circle that was made with the Big Shot and the Circle #2 Die. The Happy Halloween is from Teeny Tiny Wishes and can you guess which ink I used to stamp it? Yep, Jet Black Stazon on Very Vanilla Card Stock. These are just a quick and easy treat. The cellophane bags will hold many different items including candy, pencils, and small toys. Well, it is time to make my third trip to school to take kids so I had better keep it short. Thanks for stopping by today and be sure and check out my calendar on my website as I have added classes and activities. Have a great weekend, Tonya
Thursday, October 13, 2011
Christmas Box

Good morning, I am so excited to announce that the Christmas Box that was a recruit promotion is now available to purchase. Several of you have got to see my Christmas Box whether is was at club or a workshop and I am going to offer you the chance to make your own. The kit does not include the Pines & Poinsettias Stamp Set or the adhesive but it does include all the other supplies plus the box. So on October 24 at 6:30 I will be holding a Christmas B0x Class for only $30 which will include all your adhesives and the other supplies need. Since the Christmas Box is only available while supplies last I need to place the order as soon as possible and class size will be limited to the first 6 people. If you can not attend the class but would like to purchase the Christmas Box Kit the cost before tax and shipping is $19.95. I will be happy to order it for you just contact me. If you have any questions please email or call me. This is sure to be a items that you use over and over again through the years. Thanks for stopping by and have a great day, Tonya
Wednesday, October 12, 2011
Happy Halloween
 Good morning, I am going to post earlier today and hope that the rain moves out so that I can get my run in later. I had a workshop on Friday at Patti's house and one of the projects we made was this card. It uses the Dark & Dreary Stamp Set and Pick Your Poison Designer Series Paper. The base is Pumpkin Pie Card Stock with the Spider Web added with the Big Shot and then sponged with Wisteria Wonder Classic Ink. The Happy Halloween was stamped with Jet Black Stazon on Very Vanilla Card Stock and again on Perfect Plum Card Stock then the 31 was punched out. The main image was sponged with both Peach Parfait and Pumpkin Pie Classic Ink and we added a few Rhinestone Basic Jewels to the image too. We also used Basic Gray Card Stock which was punched out with the Dotted Scallop Ribbon Punch and Basic Black Taffeta Ribbon.
 I have another night of Stamp Club tonight, it will be a larger group than last nights and I am excited to see everyone. :) I will be working on a few new projects today too and will share them with you as soon as I have them finished. Don't forget about all the specials that Stampin'Up! is offering right now. Whether you are a customer or a new recruit it is a great time to be a part of Stampin'Up! Thanks for stopping by today and as always please let me know if you have any questions. Have a great day, Tonya
Tuesday, October 11, 2011
Tile Technique

Hello and good afternoon today I want to share one of the projects that we will be making this week at Stamp Club. It is a faux tile and is so quick and easy to make with the help of our new scoring board. I love mine and am so glad that Stampin'UP! added it to our products. The stamp set is Gently Falling which is in the Holiday Mini. I used the colors: Cajun Craze, More Mustard, Chocolate Chip and Elegant Eggplant for this card but any fall color combo would look great. The layout is pretty straight forward but I did add a little extra texture on the Elegant Eggplant band by using the Big Shot (free this month to all new recruits) and the Houndstooth Embossing folder. The sentiment is from the Pretty Postage Stamp Set and after marking each Thanks for either Elegant Eggplant, More Mustard or Cajun Craze and stamping on Very Vanilla Card Stock I punched it out with the 1" punch and then layered it with the Postage Stamp Punch. Sorry for the short post but I am off to make some phone calls and see if I can fill up my schedule with workshop for November. If you would like to host give me a call. Thanks, Tonya
October 11 Digital Downloads
Good morning, I will be back later today with a new card to share but for know I wanted to let you know that there are new Digital Downloads available today. It is time to start thinging about your Christmas Cards and today's new downloads will make card giving a breeze this year. To take a look just head over to here then give me a call if you have any questions.
Also to Stampin'Up! has challenged their Demonstrators to book 10,000 workshop world wide during the Oct 15- Nov 30. If you would like to be part of this event and help us reach our goal then please contact me. I have dates available and will offer any one who books during this time a extra bonus in addition to the all ready wonderful hostess benefits. Remember you can always hold your event at my house if you don't have room at yours. Have a great day and thanks for stopping by, Tonya
Also to Stampin'Up! has challenged their Demonstrators to book 10,000 workshop world wide during the Oct 15- Nov 30. If you would like to be part of this event and help us reach our goal then please contact me. I have dates available and will offer any one who books during this time a extra bonus in addition to the all ready wonderful hostess benefits. Remember you can always hold your event at my house if you don't have room at yours. Have a great day and thanks for stopping by, Tonya
Monday, October 10, 2011
Halloween Candle

We had a great weekend and it all started with Patti's workshop on Friday night. This is a yearly event and it is always a fun time. The theme is Halloween and for Patti's hostess gift I made this candle. The technique is a fun one and so easy to customize your candles for every event. I used the Dark & Dreary Stamp Set, Basic Black Craft Ink, Iridescent Ice Embossing Powder and the Heat Tool to make this candle. I added a little extra bling to the candle to really make it pop including the Basic Rhinestones and Glass Glitter which was added with Sticky Strip along the bottom of the candle. Would you like to learn more about this technique? If so give me a call and I would be happy to show you. Today, I am cutting card stock for Stamp Club which is this week and watch for updates on my calendar of upcoming classes as I will be working on the remainder of this month and next. Thanks for stopping by today and as always have a great day, Tonya
Friday, October 7, 2011
Extreme Halloween
 Hello and good afternoon! I have been quiet the last few days but I have five new projects to share with you over the next week so stop by often. Today's card is a halloween card that uses a nontraditional set. I used Extreme Elements and Tenny Tiny Wishes to make this fun card. The colors are Wisteria Wonder, Basic Black, Pumpkin Pie, Peach Parfait and Very Vanilla. I stamped the various elements on Very Vanilla Card Stock to create the background. I also sponged all the edges with Wisteria Wonder. I used Very Vanilla Seam Binding that was also sponged with Wisteria Wonder. To make the sentiment I ued three different punches the Modern Label, Large Oval and the Decorative Label. After adding a few Basic Black Brads to the side the sentiment was complete. I have some other more traditional halloween ideas to share with you too but not today.
Just a reminder that this month anyone who signs up to become a demonstrator will receive the Big Shot free. All ready have a Big Shot then you can pick $100 worth of merchandise for free. I would love to have you join my team and if you have any questions I will be happy to answer them for you. Thanks for stopping by and have a great weekend, Tonya
Monday, October 3, 2011
Give Thanks!
 Hello and Happy Monday! What a beautiful weekend it was here in Missouri. We spent most of Saturday outside and yesterday was spent inside catching up for the week ahead. I did get a chance to stamp a super quick card yesterday however and hope to do a little stamping today hopefully with the Big Shot in mind. Don't forget you can get a FREE Big Shot this month when you sign up to become a demonstrator. Call me at 816-662-1234 and I will be happy to give you all the details. Now back to the card. I pulled out the new Gently Falling and Hand Penned Stamp Sets and the More Mustard, Pool Party and Soft Suede Classic Ink Pads and Very Vanilla, Soft Suede and Pool Party Card Stock. The leaves and acorns were randomly stamped around the Give Thanks and then I sponged the edges as well as the Pool Party Ruffled Ribbon with a sponge and Soft Suede Classic Ink. I wanted something on just the corners and was going to punch them then decided to add the knotted ribbon. This card would be great to send to a special friend or for Thanksgiving. Who would you send it too? I all ready have someone in mind and just know that a hand made card will help brighten their day. Thanks for stopping by and have a great day, Tonya
Subscribe to:
Posts (Atom)


