
| ||||||||||||||||||||||
Tuesday, August 31, 2010
New Downloads for My Digital Studio!


Same Supplies Two different Cards
 Good morning, yesterday while I was playing around with the Island Oasis Designer Series Paper (why I didn't start using this paper sooner I have no idea) I had plans to make the card on the left. Simple yet pretty nothing to complicated, well I was looking at the extra pieces and the back of the sheet of Designer Series Paper and decided to make a second card with the leftovers. For the first card I used Tempting Turquoise Card Stock, Island Oasis Designer Series Paper, Whisper White Card Stock, 1/4" Whisper White Grosgrain Ribbon, Wide Oval Punch and my Tempting Turquoise Stampin' Write Marker. My Tempting Turquoise Stamp Pad has gone missing and I can not find it any where if you have seen it please send it home so that the other stamp pads can be reunited with it. :) I also used the Perfect Punches Stamp Set and the Dotted Scallop Ribbon Border Punch on the first card.
The second card uses the other half of my sheet of Tempting Turquoise Card Stock and on the other side of the Polka Dot Paper is the lattice looking design with Old Olive and So Saffron. I changed this card to a horizontal card and textured half of the front with the Square Lattice Textured Impressions Die and the Big Shot. Then I used the Modern Label Punch and Punched out the bottom right side of the card. I used the punch out and my Teeny Tiny Wishes Stamp Set to make the sentiment that is inside the card, but shows through on the outside. The smaller picture is a close u
 p of that area. Then I just added a strip of Old Olive Card Stock to my Designer Series Paper before adding it to the nontextured side of the card. Pretty simple yet great for a guy card and easy to mail as there are no embellishments to cause problems.
Don't forget today is the last day to order from the Summer Mini and also the last day to take advantage of my Anniversary Special. If you would like to place an order you can give me a call or email me and I will be happy to help. Thanks for stopping by today. I am off to do some school work then maybe a little stampin'. Have a great day, Tonya


Monday, August 30, 2010
More Fun and Fast Birthday Cards!

Good afternoon, I don't usually post two projects in one day but since this uses the Island Oasis Designer Series Paper that will not be available after tomorrow I thought I would share it with you today. It is another Fast and Simple Birthday card that I made today. I made two others that I will share with you tomorrow. I used Pumpkin Pie Card Stock for the base and added Polka Dots to the top with the Polka Dot Texture Impressions Folder (just on the top half). I cut the Designer Series Paper into strips and then staggered them. The name of the technique is escaping me at this moment but I will add it later. Then to finish off the card I used the Perfect Punches Stamp Set and the Tempting Turquoise, Rose Red, and Old Olive Stampin' Write Markers to ink up the image then punched it out with the Wide Oval Punch. I added a Pumpkin Pie flower button with a Mini Glue Dot just because the swirl under the Happy Birthday reminded me of a flower stem. Now I have another Birthday card ready to send out. Hope you enjoyed this card and thanks for stopping by. Have a great evening, Tonya
Five New Colors are Now Available for My Digital Studio!
Stampin'Up! just made this announcement about the final five colors for My Digital Studio. I have already downloaded my free update and if you have My Digital Studio I encourage you to update yours too. I love playing with My Digital Studio and can't wait to try out the "New" Colors. Scroll down to see my card post for today. Thanks, Tonya
Pacific Point, Tangerine Tango, Pink Pirouette, Bravo Burgundy, and Elegant Eggplant are now available for free download for My Digital Studio. Keep your My Digital Studio card stock collection complete and up-to-date by downloading these five favorites today!
Click here to download: http://www.stampinup.com/us/enu/16011.asp
Quick and Easy Birthday Card

Good morning it is Monday and after a weekend of no stamping I am ready to start making some new cards and other projects. Today's card is a quick and easy one that I made last week. It features the Island Oasis Designer Series Paper that is only available through tomorrow. September is a big birthday month in our family and I need lots of cards. I am not sure this one will be used for this month but it really would be great to make a bunch up with different Designer Series Papers and have on hand just in case a birthday creeps up on you. Not that that ever happens at our house. The stamp set I used is Afterthoughts and is a level 1 hostess set which is super easy to earn with a $150 party or order. The rest of the card consists of So Saffron Card Stock, Whisper White Card Stock, Tempting Turquoise and Pumpkin Pie Stampin' Write Markers, 5/8" Pumpkin Pie Grosgrain Ribbon and the Curly Label Punch. The window of the card was made with the Big Shot and the Movers and Shapers Curly Label Die. I am going to keep this short so I can head off to stamp and make some more cards. Check out my Anniversary Special that is going on today and tomorrow in the post below. Thanks for stopping by and have a great day, Tonya
Sunday, August 29, 2010
Happy Anniversary to Me!
It has been six years since I decided to become a Demonstrator and I never dreamed I would enjoy it as much as I do. I really only signed up to get the discount and of course the sneak peaks and advanced ordering, but what I have found over the last six years are some wonderful friends and also that I really enjoy sharing Stampin'Up! with those around me. So as I celebrate my 6 year anniversary I would like to offer a special to you. Now through August 31 for every $30 worth of merchandise that you buy I will give you a package of Jewels Free. Please let me know when ordering if you want the Basic Rhinestones or Basic Pearls. For online orders I will email you after you place your order to see which you would like and then mail them directly to you. If you order $60 then you will receive two sets of Jewels Free and so on. Also if you have ever considered becoming a demonstrator then September is a great month to sign up. New Demonstrators in the month of September will receive the Craft Tote that was sold at Convention this year for free just for signing up that is in addition to all the great supplies that you get in the Starter Kit. Give me a call if you have any questions about becoming a demonstrator and I would be happy to meet with you or call you if you are not local. I will add a picture tomorrow of my tote with a few of the supplies that you receive when you sign up to become a demonstrator.  Thanks and have a gr
 eat day, Tonya
 Thanks and have a gr
 eat day, Tonya
Wednesday, August 25, 2010
Halloween Treat and a Sneak Peak!
 Good morning, wow what a busy week we are having at our house. I am finding free time during the day to stamp so that is a good thing. I have new projects to share with you. First just a reminder the Summer Mini will be ending this month. If there is anything that you haven't ordered and would like to please contact me so we can get your order placed. To view the Summer Mini just click on the icon on my sidebar with the Mini picture. Today I have a Halloween Treat project for you. It used a items from the Catalog as well as a sneak peak from the Holiday Mini that starts September 1st which is of course right around the coroner. It is a new Big Shot Die called Candy Wrapper and it is easy to make and perfect for Halloween candy or I am also thinking it would make a great ornament for a tree whether it is a Halloween or Christmas Tree. The Wrapper is 2" long without the ends. The other items that I used are Wicked Fun Specialty Designer Series Paper, Wicked Cool Stamp Set, Bitty Bat Punch, Oval Punch, Jet Black Stazon Pad and Sticky Strip. I could have added some ribbon on the ends but it doesn't need any adhesive to keep them folded like they are in the picture. You only use the Sticky Strip on the side to close your wrapper. Would you like to make some of these for all your Trick or Treaters? Then give me a call and on September 1st I will get your order placed. Remember that Stampin'Up! has online ordering and orders placed through me can be shipped any where in the USA. Thanks for stopping by and have a great day, Tonya
Tuesday, August 24, 2010
Christmas Sneak Peak

Hello! Today's post is a sneak peak from the upcoming Holiday Mini! I am super excited about it and the new products that are available, including fabric, yep fabric that matches with our Designer Series Paper. How GREAT is that!!! I hope it is a trend of more to come but if not I will enjoy the fabric for the next four months. No fabric on today's card but it does use a new set A Cute Christmas. This is a simple 4 1/4" square card. I used Old Olive, Cherry Cobbler and Crumb Cake Card Stock. The image was stamped with Basic Gray Classic Ink and then watercolored with So Saffron, Early Espresso, Old Olive and Cherry Cobbler Stampin' Write Markers and the AquaPainter. To finish off the card I used the 1/8" Early Espresso Taffeta Ribbon and a Cherry Cobbler Button. Cute and simple and most of all easy to make a lot off if you have a long Christmas Card List. This card would be perfect to do at a workshop and you could even earn this set free with your hostess benefits. Contact me to schedule stamping time with your friends. Well, I am off shortly to take the boys to school and start my day. Hope you have a great one and thanks for stopping by, Tonya
Monday, August 23, 2010
Custom Glass Blocks
 Sorry I have been quiet for a few days. I have been super busy with custom jobs and swaps from the upcoming new Holiday Mini! If you haven't received one yet and you are a local customer give me a call this is one mini you do not want to miss out on. It is filled with so many new and exciting products. I will share the swap cards with you another day but for now I have a Etched Glass Block that I was asked to do for an upcoming wedding. The bride is going to use these for the center pieces at their reception. She is going to add lights inside and a bow but I think it is gorgeous just like this! I have done these as a glass a few years ago and am looking at my calendar to do them again, probably late October or early November before all the Holiday rush begins. If you don't want to make your own but would like me to make it for you just contact me and we can work out the details. Thanks for stopping by today and I hope that you come back again! Have a great day, Tonya
Thursday, August 19, 2010
Felt Reinker Technique Tutorial
Good morning, a few weeks ago I shared This Hydrangea Card with a new technique and I wanted to share a tutorial on how to do the Felt and Reinker Technique. This technique was featured in last months Stampin' Success Magazine, which is a great magazine that demonstrators receive just for being a demonstrator. If you want to start getting Stampin' Success give me a call and I will help you join my team. I have added pictures that will hopefully help. You will need one styrofoam plate, felt square, Sharpie Marker, a waterproof ink ( I used Jet Black Stazon), Reinkers (Old Olive, Pretty in Pink and Bashful Blue were used for this card), stamp (Because I Care Hostess Set) and Light colored card stock.
1. Fold your felt into fourths, making sure that it is big enough to fit your stamp. Ink up stamp with Jet Black Stazon and stamp directly onto the felt. Before you lift the stamp trace around the block with the Sharpie Marker. This will act as your guide when inking your stamp. Clean stamp.
2. Add reinkers to the felt image. If using multiple colors make sure and leave a little space between as they will spread. I used the Old Olive on the stem and leaves and the Pretty in Pink and Bashful Blue on the flowers. Let the felt pad set for just a little bit to allow the reinkers to spread.
3. Now you are ready to stamp. Reink your stamp by lining up the block with the outline on felt. Then stamp on your card stock. You can do this multiple times without needing to reink or clean your felt pad. I have made just over 30 images at one time.
This technique allows you to get the look of using markers on an image without having to marker the image multiple times. It is a great time saver and you can simply rinse out the felt and allow it to dry to use it over and over again.
 I hope you enjoyed today's tutorial. If you decide to make your own Felt and Reinker Project please leave me a link to your creation. Thanks for stopping by and have a great day, Tonya
1. Fold
 your felt into fourths, making sure that it is big enough to fit your stamp. Ink up stamp with Jet Black Stazon and stamp directly onto the felt. Before you lift the stamp trace around the block with the Sharpie Marker. This will act as your guide when inking your stamp. Clean stamp.
2. Add reinkers to the felt image. If using multiple colors make sure and leave a little space between as they will spread. I used the Old Olive on the stem and leaves and the Pretty in Pink and Bashful Blue
 on the flowers. Let the felt pad set for just a little bit to allow the reinkers to spread.
3. Now you are ready to stamp. Reink your stamp by lining up the block with the outline on felt. Then stamp on your card stock. You can do this multiple times without needing to reink or clean your felt pad. I have made just over 30 images at one time.
This technique allows you to get the look of using markers on an image without having to marker the image multiple times. It is a great time saver and you can simply rinse out the felt and allow it to dry to use it over and over again.
 I hope you enjoyed today's tutorial. If you decide to make your own Felt and Reinker Project please leave me a link to your creation. Thanks for stopping by and have a great day, Tonya
Wednesday, August 18, 2010
New Digital Downloads Available for My Digital Studio!
Stampin'UP! has announced new Digital Downloads for My Digital Studio. Remember you can purchase these anytime just by going to My Website and clicking on Shop Now. You don't need My Digital Studio to purchase or use these. If you have any questions please let me know. Thanks, Tonya
The latest group of digital downloads for My Digital Studio are now available!
| Item | Description | Price |
| 122157 | Striped Grosg rain Ribbon Color Pack rain Ribbon Color Pack | $3.95 |
| 123367 | Flower Brads Brights Pack  | $1.95 |
| 123374 | Flower Brads Subtl es Pack es Pack | $1.95 |
| 123381 | Flower Brads Regals Pack | $1.95 |
| 123388 | Flow er Brads Neutrals Pack er Brads Neutrals Pack | $1.95 |
| 121438 | Play Date Designer Series Paper Designer Series Paper | $4.95 |
| 123432 | Play Date Qu ick Accents Kit ick Accents Kit | $5.95 |
| 123433 | Play Date Embellish ments ments | $3.95 |
| 121439 | Forest Friend s stamp brush set s stamp brush set | $1.95 |
| 121440 | Letters st amp brush set amp brush set | $9.95 |
| 123431 | Funky Four stamp brush set | $3.95 |
First Day of School!
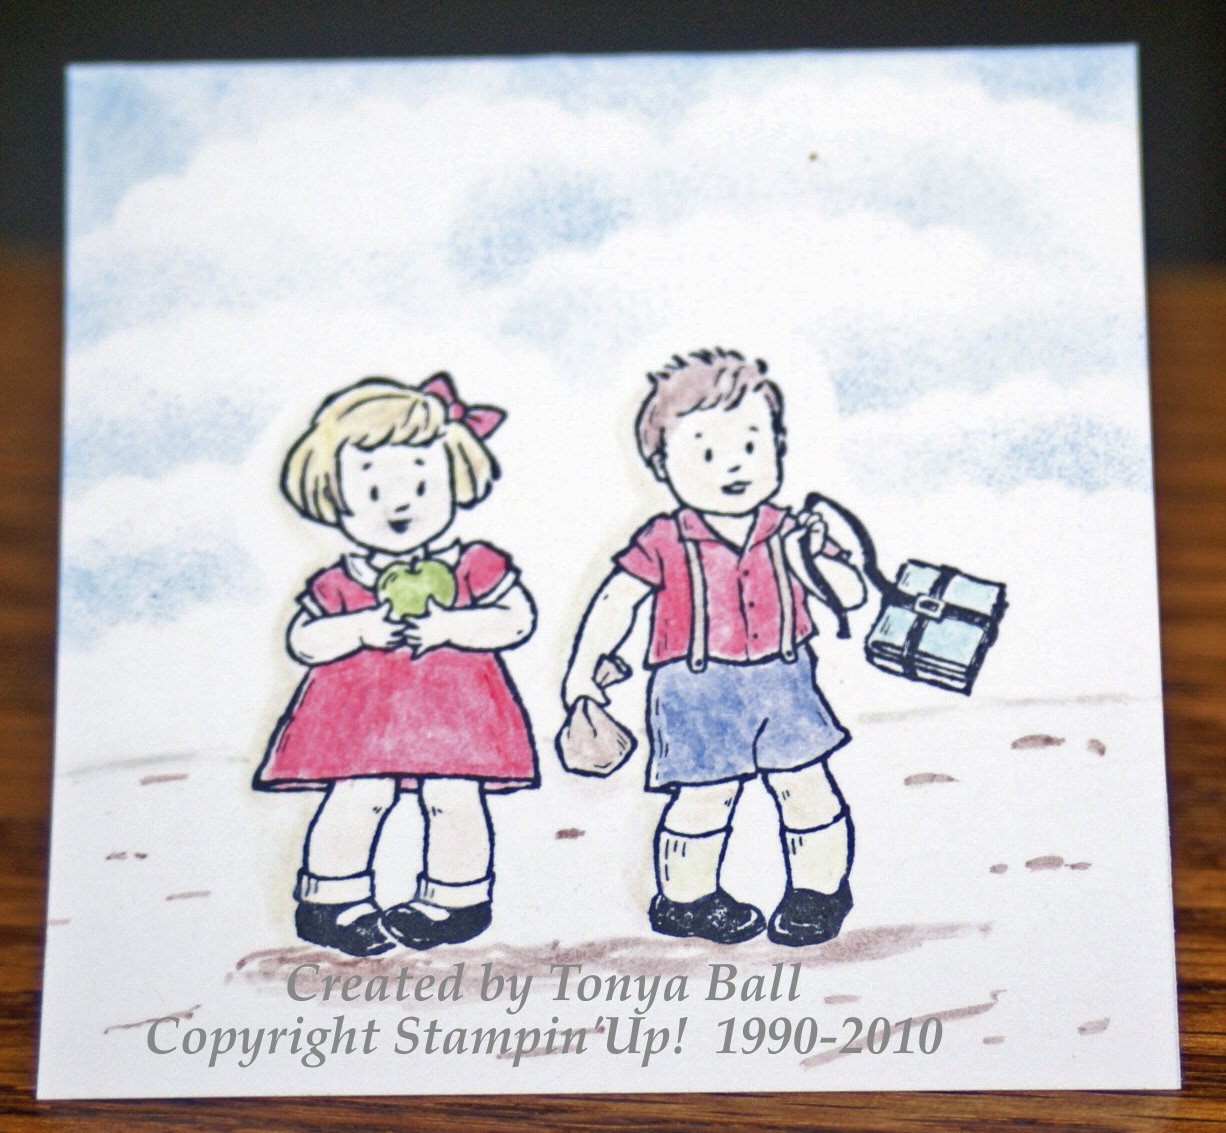 Good morning! Today is the first day of school for my boys and so everyone is back in school and my house sure is quiet. I do have a list of things to complete before they come home today (only a half day for everyone) but before I start those I wanted to share a cute little 3"x3" card with you today and a couple of pictures of my kids on their first days of school. I hope their day goes well and that they enjoy catching up with all their friends on the summer time fun. Now back to the card. I LOVE the new stamp set Greeting Card Kids and have been using it a lot lately. I will share some more cards later that I have made with it, today I decided to use the school kids. I stamped them with Jet Black Stazon and watercolored with the Watercolor Crayons and Blender Pen. I used some sponging to make the sky with the Bashful Blue Classic Stamp Pad and then added a little ground with the Blender Pen and Chocolate Chip Marker. I may add a little more sponging on the ground but haven't quite decided yet. This card is the perfect size to send a note to the teacher or even slip in your child's lunch box or backpack to let them know you are thinking of them. If you haven't taken a look at this stamp set I encourage you to! It is just to cute and if you want to watercolor then it is the perfect set. Well, I am off to run errands, do laundry and start working on the three folders of papers I need to fill out for school. Filling out all those forms is just one of my favorite activities, ok not really not even close. :) Have a great day and thanks for stopping by. Now that the kids are back in school I hope to get into a regular stamping routine so that I have new things to share. Thanks, Tonya

Tuesday, August 17, 2010
Locker Caddies
 Good morning! Well, day one of high school was a success so we are onto day two. The boys start tomorrow and I should have more free time to stamp. Today I thought I would share with you two of the locker caddies that the girls made last week while at my house. Each locker caddy was different but they all used the fun Sunny Garden Designer Series Paper. There were different mirrors and I really like how on the right caddy the mirror is rotated to look like a diamond shape. Each girl also make a coordinating ink pen for all those important notes and the pocket on the bottom left is the perfect size for index cards or a lunch card. If you have any questions about the locker caddies or would like one of your own email me and I will help you. Thanks for stopping by and I hope you come back again. Have a great day, Tonya
Monday, August 16, 2010
Just Believe Anniversary Card

- Hello and Good morning, we had a busy and fun weekend that included an anniversary party for my Aunt and Uncle. They have been married 40 years. Of course they needed a special card to mark so I made this one that is again an Easel Card. I really like this style and it makes such a nice presentation. The card only uses two colors which are Cherry Cobbler and Very Vanilla. I really like the new Cherry Cobbler and can't wait to use it on Christmas Cards. Yes, I am already thinking Christmas! It will be here before we know it. The only stamp set used was Just Believe which I received at Convention. The main image was stamped four times with the Cherry Cobbler Classic Stamp Pad. once on the Very Vanilla and three times across the front of the card front. The smaller floral image was stamped on the inside of the card and also on the envelope for a nice finished look. The sentiment is also from the Just Believe Stamp Set and after stamping it on a scrap piece of card stock it was punched out with the Modern Label Punch and attached with Stampin' Dimensionals. I added a small pearl to the center of one flower on the main image and rounded the corners with the Corner Rounder Punch. A little Very Vanilla Satin Ribbon and this card is finished. We also made this card at Stamp Club this last week and it would be a great workshop card. If you are interested in making this card yourself just give me a call and we can set up a private class for you and your friends. Well, I am off to spend some time with my boys before they have to go back to school again. Have a great day and thanks for stopping by. I hope you come back again soon, Tonya
Friday, August 13, 2010
Birthday Pennant Card!

Pennant are hot in the paper crafting world right now. So while at Convention Carrie Cudney showed us a super cute and easy way to make pennants and this card is based on the one she shared with us. I just loved the idea of showcasing the new In Colors and they look so cheery and fun together. To make the pennant all you need is the Star Punch and Paper Snips, yep it really is that easy. Punch out one of each of the five In Color Designer Series Papers. You can pick the patterns you like best for my card I picked the stripes and polka dots. After you have the stars punched you cut one point at the base off the star. This gives you the pennant, so you can make five pennants from one star. The base is Pear Pizzazz. The pennant banner is added to a layer of Crumb Cake Card Stock that I have poked two holes into with the Paper Piercing Tool. Add a piece of Hemp Twine for your Pennant String secured on the back side of the paper and you are ready to add the pennants. I secured them with Mini Glue Dots making sure that the glue dot is at the top of the pennant. Attach the pennant to both the Hemp Twine and the Crumb Cake Card Stock and your pennant banner will stay in place. To finish off the card we used the Happy Birthday from the Teeny Tiny Wishes Stamp Set and Concord Crush Classic Stamp Pad. Simple but cute and easy to give. I hope you enjoyed today's card and that it has inspired you to go and stamp something. :) Thanks for stopping by, I hope you come back again, Tonya
Thursday, August 12, 2010
Fun and Funky Bag!
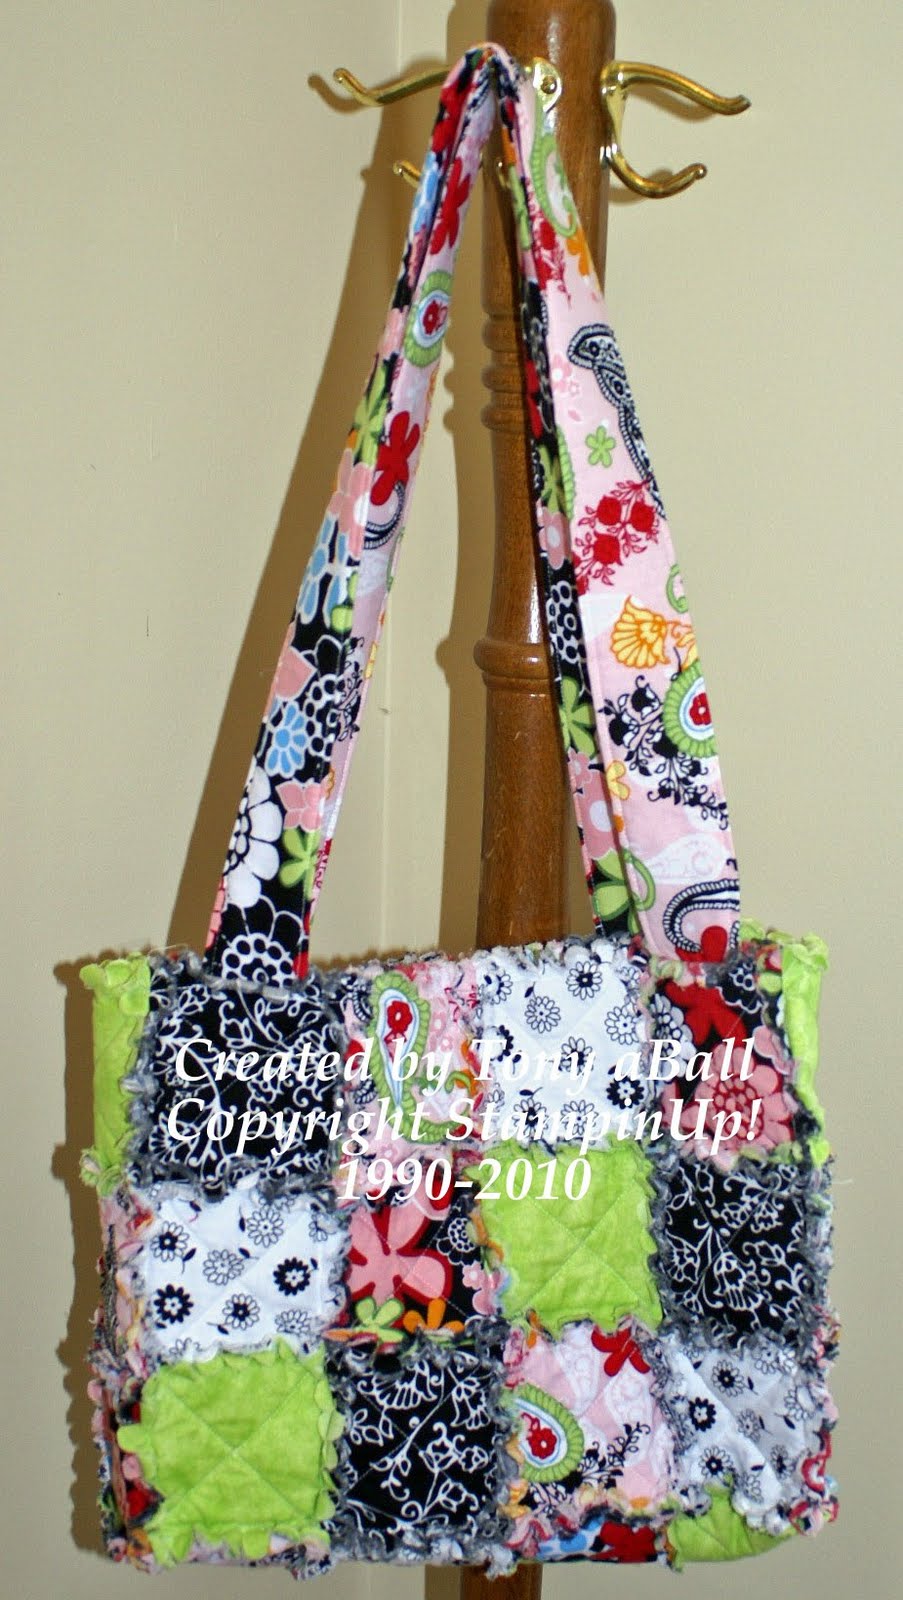
Good morning, I found yet another picture of one of the book bags I made at the end of the year for one of our wonderful teachers. This one was my middle son's teacher's bag. I had the kids pick out the fabric and I really like how these all came together. I haven't been sewing lately but just looking at this bag makes me want to go by fabric and get busy sewing again. I hope the teachers are enjoying their bags and that they get lots of use out of them whether it is for school or personal use. I made a bag similar in size to this one for convention and it worked great to help carry around swaps and such. Well, I had better run I have four wonderful girls coming over this morning to make locker caddies. I will try and remember to take a few pictures of their projects so I can share with you later. They are using the fun and cheery Sunny Garden Designer Series Paper. :) It makes me happy just looking at the paper! Have a great day and be sure and stop back by later today as I am working on pictures of our Stamp Club Projects. If you would like to have a bag like one of these contact me and I will be happy to make it for you. Thanks and have a great day, Tonya

Wednesday, August 11, 2010
Shimmer Plum

Busy week at our house, I have had Stamp Club and Locker Caddy Classes this week and while I do have projects to share with you I just haven't found the time to take the pictures and edit them for publication. I hope to squeeze that in tomorrow. So for today I thought I would share a card I did a while back. There is a little bit of retired ribbon but other than that I think the card is easy to duplicate. Can you see all the sparkle on the card? That is from the Vanilla Shimmer Smooch Spritz that I added to the card. It really is pretty and adds so much to a card. The stamp set is Elements of Style which is one of my favorites. The colors that were used in the card are Perfect Plum, Old Olive and Basic Gray. I used the Aquapainter and the Classic Stamp Pads to color in the Floral Image. The design on the card base is also from the Elements of Style Stamp Set and is Perfect Plum Classic Ink on Perfect Plum Card Stock. The main image is cut out with the Top Note Die in Whisper White Card Stock and again with Basic Gray Card Stock. The Whisper White Top Note is trimmed so that it is smaller and layers with the Basic Gray Top Note. The Ribbon is Basic Gray Taffeta which is retired but the new Basic Black Taffeta Ribbon would work great in its place. If you have any questions about the card please leave me a comment. Just a couple of reminders the Summer Mini Catalog sales period ends at the end of the August as well as the extra Hostess Benefits if your workshop total is over $350. There is still time to schedule your workshop or book party so that you can earn extra free merchandise. Thanks for stopping by and please come back again. Tonya
Monday, August 9, 2010
Totally Birthday!
 Good evening! I thought I would share one more Easel Card with you. This card was for my daughter's 15th birthday and even though she doesn't have straight hair by any stretch of the imagination I just couldn't resist using Totally Tess and she needed a super sized cupcake to deliver to our birthday girl. The cupcake is from Crazy for Cupcakes Stamp Set. Crazy for Cupcakes is one of my favorite birthday set. To make Tess I used a lot of paper piecing and the wonderful new Designer Series Paper Lap of Luxury. It has the new Concord Crush, Pretty in Pink, Very Vanilla, and Basic Gray. I used Whisper White Card Stock, Concord Crush and Pretty in Pink Card Stock for the card and Jet Black Stazon Ink. For the areas on Tess and the cupcake that weren't paper pieced I used the Watercolor Crayons and a Blender Pen to add color. It is really hard to tell in the picture but Tess has two buttons on her shirt and for those I added two of the smallest sized pearls from the Basic Pearls Jewels. I used the beautiful Pretty in Pink 5/8" Satin Ribbon. The satin ribbon ties so nicely and gives the card a nice look. I didn't add the inside picture but it has Happy Birthday inside from the Perfect Punch Stamp Set.
Tomorrow night is our first Stamp Club night of the new round. I am excited to see everyone and get to stamp with some new ladies. If you are in the area and would like to join us give me a call, we would be happy to have you. It is getting late and I have some more to do before I head off to bed so I had better keep this short. Thank you for stopping by and please come back again.
Have a great day, Tonya

Friday, August 6, 2010
Easel Card and A New Technique!
 Good afternoon! This is the first day of our Three Day Tax Free Weekend in Missouri for school supplies so I took all four of my kids shopping for backpacks, crayons and all of those other fun school supplies. May go back and do some clothing shopping but for now they are one step closer to going back to school. Tomorrow is the birthday of two very special ladies in my life. I would even go to say they are the two most important ladies in my life. Yep, my mom and my daughter share a birthday and tomorrow is their big day. So for my mom's card I usually do something with yellow as it is her favorite color and the new Daffodil Delight is a perfect shade. I am not a yellow person and I really like it a lot. My wonderful friend and fellow Demonstrator, Sarah, recently gave me a Easel Card and since I have never made one before I thought it was about time and while at Convention I received a beautiful card that used a new (at least to me) technique called Faux Mother Of Pearl and I decided to combine the two and this is what I came up with. I won't go into all the details on the Technique in this post but will at a later date. With all the new techniques I learned at Convention it might be time for another technique class. What do you think? Supplies for the card are Daffodil Delight Card Stock, Basic Black Card Stock, Whisper White Card Stock, Sincere Salutations Stamp Set, Elements of Style Stamp Set, Champagne Mist Shimmer Paint, Jet Black Stazon, Daffodil Delight Classic Stamp Pad, Old Olive Classic Stamp Pad, Aquapainter, Daffodil Delight Taffeta Ribbon, Scallop Oval Punch, Scallop Trim Corner Punch, 1"Circle Punch, a
 nd 1 3/4" x 7/8" Oval Punch. I have added several pictures of the card so that you can see the Easel Style and see the main image which is where I did the Faux Mother of Pearl. The nice thing about the Easel Card is that it folds flat for mailing in a standard size envelope.
If you have any questions about the card or would like to try the Faux Mother Of Pearl Technique let me know and I will work out a class for this technique and if you happen to see my mom or daughter tomorrow be sure and tell them happy birthday but don't mention the card to my mom until after she gets it. ;)
Also don't forget to get me your Tax Free Orders before the weekend ends so that you don't miss out. Thanks for stopping by today and have a great weekend. We have a fun filled one planned. Tonya

Thursday, August 5, 2010
Convention Make-n-Takes Part 1
 Hello! Today we went and got K's schedule for her freshman year. There were lots of freshman girls but things moved pretty quickly and she only had one class that she wanted but couldn't get in. Not to bad I guess for her freshman year. I did make a card today but I am going to save it for tomorrow as it is a birthday card for Saturday and even though the birthday person won't be on my blog I am still going to wait. Today I am going to share with you two of the cards we did while at Convention. I really love this new stamp set (Just Believe) and will be using it quite a bit I predict. The first card is fairly simple but shows a fun why to add dimension to your one layer cards. The second card is a little more complex but still doable to workshops or classes. It showcases our Stampin' Write Markers (which are tax free August 6-8) and the Color Spritzer. If you haven't tried the Color Spritzer why not schedule a private class for you and your friends and I will show you how to use the Color Spritzer. We also used the Wonderful new Buttons. I love how shiny and smooth they are and they colors are so wonderful. I have the Brights right now and will be adding more on future orders.
Wednesday, August 4, 2010
New Technique Time!
 I was going through the pictures of swaps from Convention that I have not posted yet and this is one that I found. It was for a technique swap that I did. The layout probably looks familiar as it is one that I did earlier but I added the Shimmery Resist Technique to the main image. The technique is fairly simple to do. I used the following supplies for the technique. Black Craft Pad, Clear Embossing Powder, Heat Tool, Sponge Dauber, and Champagne Mist Shimmer Paint. I used the Artistic Etchings Stamp Set, Very Vanilla, Riding Hood Red, and Basic Black Card Stock, Jet Black Stazon, Riding Hood Red Classic Stamp Pad, Crumb Cake Classic Stamp Pad, 1/8" Basic Black and Very Vanilla Taffeta Ribbon and the Vintage Wallpaper Embossing Folder. The technique is fairly simple in that you heat emboss your main image then apply the Shimmer Paint with a sponge dauber over the card stock including the embossed image then using a paper towel remove the shimmer paint from the image. It will resist the paint. After the paint dries which is pretty quickly you can use the sponge dauber and ink up the stamps for the background with Shimmer Paint. It is easier to see in the close up picture what I am talking about. If you would like to learn more about this technique contact me and we can set up a private class for you and your friends. Thanks for sto
 pping by and I will be adding new projects soon. I have been doing some stamping I just haven't finished up some of the projects yet. I also still have the projects we made at Convention to share with you. Have a great day, Tonya
Tuesday, August 3, 2010
Tax Free Weekend!
With the upcoming tax free weekend for school supplies there are the following items available on the school list. If you would like to order any of these items tax free I will need to place your order August 6-8. Please contact me with your order details. I will be out of town the Aug. 7 for a family event and will respond to emails on the 8th. If you have any questions please feel free to email or call me. Thanks and have a great day, Tonya If you are having trouble viewing this post. Please leave me a comment. I am finding that it looks different on the two computers we have in the house. Thanks again.The following are the items that are tax free for the upcoming weekend in Missouri.
Item # Description Price
100425 2-Way Glue Pen $3.50
104332 SNAIL Adhesive $6.95
104331 SNAIL Adhesive Refill $4.50
103305 Dotto $12.95
100902 Dotto Refill $6.50
104045 Anywhere Glue Stick $3.95
104294 Sticky Strip $6.95
104430 Stampin' Dimensionals $3.95
103683 Mini Glue Dots $4.95
103579 Paper Snips $9.95
103179 Craft & Rubber Scissors $19.95
108360 Craft & Paper Scissors $29.95
101879 Watercolor Pencils $19.95
105021 White Uni-Ball Signo Gel Pen $3.95
102845 Blender Pens $9.95
Various Stampin’ Write Markers (individual)$3.50
120948 Many Marvelous Markers New Color Kit $35.95
119801 Many Marvelous Markers In Color $14.95
119700 Many Marvelous Markers Subtles $28.95
119701 Many Marvelous Markers Regals $28.95
119702 Many Marvelous Markers Brights $28.95
119703 Many Marvelous Markers Neutrals $22.95
120949 Watercolor Wonder Crayons New Color Kit $39.95
119802 Watercolor Wonder Crayons Subtles $16.95
119803 Watercolor Wonder Crayons Regals $16.95
119804 Watercolor Wonder Crayons Brights $16.95
119805 Watercolor Wonder Crayons Neutrals $16.95
105394 Basic Black Stampin’ Write Journaler $3.50
110755 Multipurpose Liquid Glue $3.95
120962 Stampin' Pastels $24.95
120963 Stampin’ Pastels New Color Kit $14.95
Locker Caddy Class

School is just around the corner and it is time to get your school supplies ready and why not have a super stylish Locker Caddy to start the year off? I will be holding a Locker Caddy Class on Wednesday August 11 at 1pm at my house. There are three choices for paper styles which are Playdate Designer Series Paper, Sunny Date Designer Series Paper, Build-a-Bear Workshop Pawsitively Prints Designer Series Paper(styles are shown below in order). The locker caddy measures 8"x 24" and is only 1/2" thick. The styles will all vary because of the different designer series papers, but will include a mirror, a cork board, matching pen, and three push pins. The locker caddy has magnets on the back for easy removal from the locker at the end of the year. The cost of the class is $15 and I need you to RSVP by Friday August 6 if you would like to attend. So if you have a teen or tween in your life that would love to make a locker caddy be sure and let me know. Thanks for stopping by and please come back again, Tonya


Subscribe to:
Posts (Atom)


