Showing posts with label Gift Giving. Show all posts

Friday, December 9, 2011

Snowman Gift Bag


Happy Friday! I am so looking forward to the weekend! It is going to be a busy one. My kids and I are taking part in our Church Annual Living Nativity both tonight and tomorrow. It is a ten scene drive thru that will involve lots of people and live animals too. The kids are excited and so am I!
Today I have a quick and easy gift bag to share with you. I am always in need of gift bags and love when I can make them myself. This one uses a brown paper lunch sack. I punched a hole in the top for a handle with the Wide Oval Punch then stamped snowflakes across the bag with Whisper White Craft Ink and the Serene Snowflake Stamp Set. I added Whisper White Card Stock along the bottom for snow but first I tore the top edge and added Mica Flakes with Tombow Multipurpose glue. It really holds the Mica Flakes in place. To make the snowman and present I used punches. The present is made with the 1" Square Punch and the Blossom Bouquet Triple Lyaer Punch. The Snowman is made with the 1 3/4", 1 3/8" and 1" Circle Punchs, 1" Square Punch, Word Window Punch, Snowflake Punch and the Bird Builder Punch. I added the buttons, eyes and mouth with the Basic Black Stampin' Write Marker. My snowman looked a little cold so I added a scarf made with the Marina Mist 1/8" Taffeta Ribbon. Now I just need a gift to add inside. I must admit I have not done any shopping this year and I really need to get busy before I can't find what I need.
Well, I am off to start decorating the house. Have a great weekend and Thanks for stopping by! Tonya

Wednesday, December 22, 2010

Teacher Gift Part 2


Hello, things are starting to calm down at our house and I hope to get to do some baking with the kids tomorrow or Friday. We haven't made sugar cookies yet and I want to give them a try with Quail Eggs so that my youngest can have some. My little guy has a wonderful reading teacher who has helped us both so much this year and her birthday is next week. So for a combo Christmas/Birthday Gift I decided to make her a Note Pad Case. This one is made with the Clear Stamp Cases that we sell for just $4.95 for 4. I had the notepads that were already just to fit from another project and they fit perfectly inside. The stamp sets are Notably Ornate and Lovely Letters. I just recently received Notably Ornate and just had to try it out. I used Jet Black Stazon and Riding Hood Red Classic Ink. The card stock I used is Crumb Cake, Very Vanilla and Basic Black. The designer series paper is Love Letters. The only thing you need to remember when making the covers is to keep them flat with no dimension as they fit between the case and the protective plastic cover. You can toss this in your purse or book bag and always have it ready for notes. We also made a similar ones in club this month with Totally Tess and each persons initial. I mentioned to my club ladies that it would be a great place to have their wish list. ;) If you would like to place an order for your own Note Pad Case give me a call and I will be happy to help. I will be back tomorrow. Thanks for stopping by and have a great week! Tonya

Tuesday, December 21, 2010

Designer Series Gift Sacks!

With all the gift giving that has been going on this week, I needed a cute way to package the kids teacher's gifts so I decided to make gift bags from Designer Series Paper. I had made a bigger version of this bag last year from directions I found on line but I decided I could make a smaller version just by taking a few measurements. The size of the finished bag is 6" high x 3" wide x 6" long. To make the bag you need two sheets of designer series paper with the same print. I will work on a tutorial if you would like to know how to make these bags. The tag is made with the 2 1/2" Circle Punch and the Cute Christmas Stamp Set. I colored the snowman and added a little Dazzling Diamonds to the snow and my son Jacob was ready to give his gift to his teacher. Inside the gift is a Snowflake Mug, Hot Chocolate and a matching fabric coaster that I showed you in this post. I hope you are having a great week. I am hoping to get some stamping in soon now that my Christmas Cards are done (yes, I sent them out late this year) and I have my baking almost done. I will be back tomorrow with a new post for you. Let me know if you want directions for the bag. Thanks for stopping by, Tonya

Thursday, December 9, 2010

Surprise inside!

So yesterday I left you without showing you what was inside the box that we had made at the Holiday Gift Giving Open House. I had planned on sharing this sooner but we had our Elementary School Music Program tonight and I spent the day helping get ready at school. This is a big event with the whole school involved. I will try and get a scrapbook page completed soon to share with you. Now back to the box and the surprise inside. I was blog hopping recently and came across these cute tea light candles. They are pretty easy to make and I did try burning one and while the tissue paper did turn a little brown it didn't really catch on fire. I would of course recommend that you not leave any candle unattended but the wax seems keep it from really burning. I found the idea on the blog Rubber Room Ramblings to view the post about the candles simply click on the blog name. To make the ones I did I used the Jolly Bingo Bits Stamp Set. This set is perfect to stamp on the tissue paper that you use to make the candles. I let each person pick which stamp they wanted to there was an assortment of candles made. The bottom picture is a little hard to see the wax seems to be reflecting the light. Sorry to keep you in suspense for so long. Please let me know if you have any questions about the candles. I will be happy to answer them. Tomorrow I will be back with a Fabric Project that I just finished up. Thanks for stopping by and as always have a great day, Tonya

Saturday, November 27, 2010

Upsy Daisy Laptop

While you were out shopping yesterday did you pick up a laptop? It is usually one of the hot items that is on sale every year. Well, if you happened to pick up a laptop and would like to add a little extra personalization to it either before you give it as a gift or use it for yourself, why not add a Definitely Decorative Design. This is my daughter's laptop that she received for her birthday a few months ago and while the blue is pretty and suits her the Upsy Daisies in white really add that extra flair that makes it her computer. You can also buy raw vinyl and cut out a name or first initial. There are so many choices to add to your laptop to make it your own. The Upsy Daisies comes in Dark Gray, Rose Red, Pretty In Pink, Old Olive, Pumpkin Pie, So Saffron and of course White. Give me a call if you would like to see the complete line of Definitely Decorative items or if you have any questions. Thanks for stopping by today and have a great day, Tonya

Wednesday, November 10, 2010

Hot Chocolate Gift

Good morning, it looks to be another beautiful day in Missouri. I just love that the sun is shining when I take the kids to school even though it is darker earlier to me the trade off is worth it. Today I want to share with you a project that I started last week but didn't get to finish. It is one that they shared at Convention and I had tucked away for a later date. Well here it is. I found these cute white mugs at a local retail store and decided they were prefect for my hot chocolate mugs. I used the Northern Frost Decorative Strip, Big Shot and Real Red Decor Elements Sheets to cut out the snowflakes. They are so easy to add to the mug. I used many of the various sizes just randomly placed on the cup. In the cup I added a homemade hot chocolate mix, marshmallows, and a candy cane. The tag is made with the 2 1/2" Circle Punch, Whisper White Card Stock and A Cute Christmas Stamp Set. I have this set in Clear Mount so both stamps were added to the same block inked with Basic Gray Classic Ink and stamped once. I used the Stampin' Write Markers in Baja Breeze, Real Red, Blushing Bride, Garden Green and Basic Black to color in the snowman. A little 2 Way Glue and the Chunky Glitter for the snow and this tag is almost complete. I added a Baja Breeze snowflake also made with the Northern Frost Decorative Strip and a Rhinestone Basic Jewel to finish off the tag. I used Real Red Satin Ribbon to tie my hot chocolate bag closed and the Clear Tinsel to add the tag to the bag. To finish off this gift idea I made a coaster with the Candy Cane Christmas Fabric. It was so easy to make just layer two pieces of fabric with a piece of cotton batting between then, run it through the Big Shot with the Clear Scallop Square Die. Hand stitch the edges with white thread and add a Candy Cane Big Designer Button in Real Red to the front corner. Super cute and so easy to make. I think I am going to make more of these to give as gifts to a few people this Christmas. I also have another mug made with Chocolate Chip snowflakes that will have a more vintage feel when I finish it. That's it for today, I have Stamp Club again tonight and volunteering at school today. Plus I hope to get some stamping done since I have a few ideas for new projects floating around in my head. :) Thanks for stopping by, I would love to hear from you so please feel free to leave me a comment and let me know what you would like to see me do next. Have a great Wednesday, Tonya


Monday, November 30, 2009

More Snowflakes!

Good morning, before I go on to today's project let me just remind you that today is the last day to take advantage of the fantastic Online Extravaganza Deals. Please call me if you would like to place can order. I don't want you to miss out on the great deals.
Now onto today's project. We made these baskets at this month's Stamp Club but it just didn't seem finished until I added the Small Flat Cellophane Bag (103104) some Candy Cane Kisses and Mistletoe Ribbon (116792), but I am getting ahead of myself first I should tell you how we made the basket. These baskets are easy to make with a little help from the Big Shot and the Stampin'Up! Baskets & Blooms Bigs XL Die (113484). This die cut and scores the two sides for the basket and the bottom in no time. I used Real Red Card Stock (102482). After you cut out the sides and bottom you need Sticky Strip (104294) to assemble the basket. Now if you want to add an embellishment like the snowflakes you should to that before you attach the two sides into a circle. It is easier to pierce the hole when the project is flat. (Wonder how I found that out) To make the snowflakes I used the Jumbo Snowflake Punch (116628) and punched out one from Whisper White Card Stock (100730) and one from Soft Suede Card Stock (115318). I used a small Clear Rhinestone Brad in the center of the snowflakes. After we finished the basket we used the Shimmer Paint Champagne Mist (116806) that I added to Rubbing Alcohol and made a Shimmer Spray. This adds lots of sparkle to a project. I hope you can see it better on the close up picture. Remember that the Shimmer Paint is only available until January 4. Wouldn't these baskets make a great gift for a coworker or for a goodie bag for you child's classroom.
I am off to work on Stamp Club Projects for December. They meet the 3rd and 8th. If you are interested in learning more about Stamp Club and the benefits of joining email me and I will be happy to answer your questions. Have a great day and thanks for stopping by. Tonya

Wednesday, November 25, 2009

LIghted Blocks

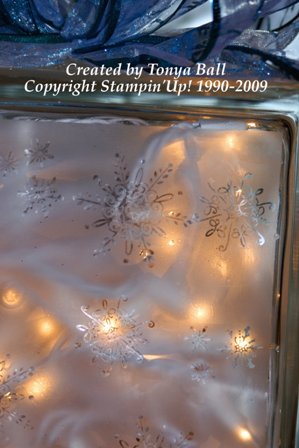
Good morning, before I run out to do my pre Thanksgiving errands and see my kids skate, I thought I would share a project that I made yesterday. I love making these lighted glass blocks and giving them as gifts. I have made them with snowflakes, the Holy Triptych stamp set and personalized them with family names. They just require a little stamping, embossing then etching, but before I get to far ahead of myself lets start at the beginning of the project. I purchase the glass block from a local home improvement store. These blocks are the ones that you see walls made out of in homes. Next my husband drills a hole in the side of the block with a special glass drill bit. After I have rinsed out all the glass pieces and let the block dry the fun part begins. You will pick the stamp set of your choice. I used Serene Snowflakes Stamp Set (115438) from the Holiday Mini and after cleaning the front of the glass block I stamped with Versamark on the front of the block. After stamping all the snowflakes that I wanted I poured Silver Embossing Powder over the entire front of the block and poured the excess into the Powder Pal Tray. I then used the Heat Tool to emboss the snowflakes. It really doesn't matter what color of embossing powder you use as it will be removed later. After you have embossed the snowflakes let the block cool. It will get hot while you embossed the images. Then I use painters tape and mark a square around the images. I then add Etching Cream (found at most craft stores) to the taped off area and let it set for 10 minutes. Be sure and read the directions on your etching cream and don't get it on your hands. After the ten minutes I simple rinse off the cream and most of the embossing will also come off too. If it doesn't then simple wash the front with a wet paper towel. I then add a string of Christmas lights and a bow and the block is finished and ready to decorate your home or give as a gift.

I have added a few extra pictures today because it is difficult to see the snowflakes. The top picture is a closeup and then the bottom is with the Christmas lights turned off. I hope you enjoyed today's post and if you are interested in making or buying one of these glass blocks please contact me. I do take orders for individuals who would like a personalized block. Thanks for stopping by and I hope you all have a wonderful Thanksgiving filled with great food but most of all with family and friends. Tonya


Tuesday, November 24, 2009

Cookies Anyone?

Good morning, everyone! Yesterday was a great day, we had our school had a Chili Supper last night at our last home basketball game. There was a great turnout and it was so much fun to see our team in action. Enough about my day and on to today's project. This is a super quick project that makes a plan Charger Plate really come to life. This plate took all of five to ten minutes if even that to complete. I used the same White Decor Element Sheets (114335)from yesterday's post and cut out snowflakes using the Snowflake #2 Originals Die (113460) and the Snowflakes #2 Sizzlits Dies (113449). I applied the larger snowflake to the center of the Charger Plate and then the smaller ones around the edge of the plate. Now all it needs is cookies and it would make a great gift for Neighbor, Coworker or Friends. One thing about adding the snowflakes the plate is not dishwasher safe.
Remember the Online Extravaganza sale is still going on until Nov. 30. You can place orders online through my Website or I can place in your order for you. Just let me know I am always happy to help. Tomorrow I will be back with another Holiday gift giving idea. Until then have a great day, Tonya


Monday, November 23, 2009

Christmas Candle

I just love to give and recieve handmade gifts. I think it show that you care enough to take a little extra time and really put something of yourself into a gift. I also like to dress up something ordinary and make it a little more special which brings us to today's project. I bought this plain red jar candle last year on Clearance at my favorite home improvement store. I was looking through my items to be altered and decided it would be perfect. I started with the Big Shot, White Decor Element Sheets (114335) and the Snowflakes Set #2 Sizzlites Dies (113449). I cut one of each of the four Snowflakes from the Decor Elements Sheets and applied one to each side of the candle. I took the Red Rhinestone Circle Brads (109110) apart and used a Mini Glue Dot to adhere them to the center of each snowflake. I added Mistletoe Ribbon (116792) to the top of the jar and then decorated the top of the candle lid. For this a used the Scallop Circle #2 Big Shot Die ( 113469) and Real Red Card Stock (102482). The larger of the two Scallop Circles is a perfect fit for the lid. I then added some Faux Snow to the edges with 2 way Glue and then a White Snowflake from the Clearanced Felt Flurries Set with a Red Rhinestone Circle Brad added to the center. I attached it with Mini Glue Dots and this gift is ready to give. I could add a simple gift tag to the ribbon if I don't want to worry about wrapping it.
I will be back tomorrow with another gift idea. Be sure and check out the Online Extravaganza and let me know if you would like to place an order. I will placing one later today and if you are local you can save on shipping by adding it to my order. Thanks for stopping by. Tonya