Showing posts with label Designer Series Fabric. Show all posts

Thursday, February 7, 2013

Stylin' Stampin' Squad February Blog Hop

 
Hello and welcome to another addition of our blog hop. If you just joined us then don't worry  you can travel onto the other blogs just by following the links at the bottom of my post. I really look forward to seeing what everyone has to share each month and this month is extra exciting as we are featuring our fabric. I love to sew and our fabric has added an extra dimension to my projects. Today I have two projects to share with you with the first being a Valentine's day card. The supplies I used are Real Red Card Stock and Ink, You are loved Stamp Set, Crumb Cake Card Stock, Basic Black Card Stock, Very Vanilla Card Stock, Basic Black Dotted Scallop Ribbon, Large Oval Punch and Scallop Oval Punch, More Amore Designer Series Fabric, Basic Rhinestones, Illiminate Glimmer Watermark Stampin' Pad, Argyle Embossing Folder, Hearts Collection Framelits, Adorning Accents Folder and to cut the fabric I used the Tasteful Trim Bigz XL Die. I attached the fabric to the card with Sticky Strip. Now to move onto the next project I have to share with you. I started this next project at 8:30 last night and it went together fairly quickly.


I have been wanting to make a new purse but didn't want the traditional Rag Purse that I have made before so I decided to make it a little more traditional and add a lining inside. I used the Scallop Square Bigz Clear die and the Tea for Two Designer Fabric. I love the colors in the Fabric they look so Spring like and I am ready to Spring. After I cut out the squares I sewed them together to create the outside of my bag. I added a simple strap and then made a liner the same way I did the outside only I used a printed off white fabric. Then I just sewed the two layers together and added a top stitching aroung the top of the bag. I think I will add stitching on the square but for now it is complete. It may get a flower to just for extra decoration if I have enough fabric leftover. I think this will make a perfect Bible Bag.
I hope you enjoyed today's fabric projects. Please leave us a comment as you go along the hop so we know that you were here. Now I will send you on your way to Dawn's Creative Chalet.
Thanks for stopping by and have great day, Tonya


Blog Hop Participants:
  1. Shellie G. of Craft Smashup
  2. Annie L. of Love Me Cards
  3. Nancy B. of Lady Stamps-A-Lot
  4. Rose C. of Stamp with Rose
  5. Tonya B. of Stampin' with Tonya
  6. Dawn S. of Dawn's Creative Chalet
  7. Pamela W. of Stinky Tofu
  8. Kim R. of Stamping with Kim
  9. Justin K of JK Cards
  10. Heidi B of Stuck on Stampin'
  11. Jennifer B of NW Stamper
  12. Bree of Craft-somnia
  13. Diana E of Stampin' Fun with Diana
  14. Darcy J of Dj's Stampin Place

Tuesday, July 17, 2012

Summer Smooches Headband and Flower

 Hello, long time no post. Sorry about that. I do have things to share and more that I am working on but no time to write posts. Wish they would just write themselves. Today I wanted to share with you a headband and flower that I made recently to match the skirt I made for my daughter in this post. I found the headband idea on Pinterest and then added the flower which can be moved to either side as it has a pin back on it. The fabric is our Summer Smooches and then I added Brights Designer Buttons in the center of the flower. I love that the headband is reversible and either I or my daughter can wear it. If you would like your own headband let me know and I will be happy to make one for you. It can have a flower or not and I will make any color that you want. Thanks for stopping by and have a great day, Tonya

Thursday, June 21, 2012

Oval Die Pin Cushion


Good morning, quick post today for a quick project. I made this pin cushion in no time at all. I used the new Oval Accent Bigz Clear Die and our new Comfort Cafe Designer Fabric and batting. I cut two layers of batting and two layers of fabric at one time using different patterns for the top and bottom. Then I stitched the layers together making sure to leave a opening to add the stuffing and then stitch the opening closed. Quick and simple and ready for pins and my next sewing project. Tomorrow I will be back with yet another project, this time I have a card to share with you. Remember to give me a call or you can order online if you want your own Oval Accent Bigz Die or the new Designer Series Fabric. Thanks for stopping by and have a great day, Tonya

Thursday, March 1, 2012

Stylin' Stampin' Squad March Blog Hop


Hello and welcome to your March Blog Hop! Whether you are joining me from Rose's Blog or just started here be sure and work your way through all the wonderful blogs. There is a complete list at the end of this post and if you click on the Next Blog Button it will take you on your way. This month one of our themes is Spring and the card I am going to share with you just feels so Springy to me. The colors are just so light and fun and of course Spring is the start of all the wonderful flowers that start to emerge after a long winter. The supplies for this card are from the Occasions Mini and include: Twitterpated Designer Series Paper, Bordering on Romance Stamp Set, Adorning Accents Edgelits Dies and Textured Impressions Folders, Paper Doily Large Sizzlits Die, Sincere Saluations Stamp Set, Baja Breeze Card Stock and Classic Ink Pad, Blushing Bride Card Stock and Classic Ink Pad, Island Indigo Classic Ink Pad, Riding Hood Red Classic Ink Pad, Basic Gray Classic Ink Pad, Pear Pizzazz Classic Ink Pad and 5/8" Whisper White Ribbon.


My second project is a fabric project and what girl doesn't want a new bag for their new Spring or Easter outfit? The ruffled bags have been showing up all over the place in catalogs and on pinterest and I decided to try and make one myself. I read through a few tutorials but in the end I just sort of winged it and while I love how it turned out I did find a few things that I would change for the next time. Like finishing my edges differently. The best part about this bag is the fabric is free this month with a $50 order. I used all of the pink prints in the Flirtatious Designer Fabric and then with the third I made a head band which I will share with you another day. I also used1/2" Melon Mambo Scallop Dots Ribbon for the trim and for the straps (which are fed through button holes on the sides of the bag) to carry the bag which is a draw string back pack style. While making the bag I decided my next project is going to be an apron with more cute ruffles. I just have to decide which fabric to use next. I have really loved doing more sewing projects lately and have a major project to share with you in the next few weeks, but it isn't quite ready yet. :)


Thanks for stopping by today. I would love to hear from you as would the other ladies in the Blog Hop. Have a great day, Tonya


Shellie G. of Creative Electica
Annie L. of Love Me Cards
Pam S. of Stampin' in the Sun!
Nancy B. of Lady Stamps a Lot
Anji C. of Altered Scraps Blog
Rose C. of Stamp with Rose
Tonya B. of Stampin' with Tonya
Amanda H. of Live Laugh Craft
Dawn S. of Dawn's Creative Chalet
Patricia T. of Sunnyone Stampin'
Heather W. of Heather's Stampin' Blog
Pamela W. of Stinky Tofu
Linda O. of Stamp at Linda's
Marla R. of Marla's Stampin' Spot
Michele M. of Michele's Stampin' Blog
Darcy J. of DJ's Stampin' Place
Nicole B. of Creations by Mommy
Pam S. of Sunny Girl Scraps
Kim R. of Stamping with Kim


Saturday, December 10, 2011

Wisteria Teddy Bear


Hello and welcome to the weekend! We are planning on doing some decorating today at our house. Not sure how much we will get done but maybe a tree or two. The little bear that I am sharing with you is actually a case from one that was on Shelli's Blog a while back. I have been wanting to make one but just kept putting the project off. Well after making this one and seeing just how easy they are to make I am ready to make more. He is a small bear just about 3 inches tall but oh so cute. He is made with three different sizes of scallop circle dies and our Flirtatious Designer Fabric. He has brads for his eyes and nose and Whisper White Taffeta Ribbon for his bow. Each scallop circle is hand sewn and stuffed with polyfill or cotton balls then the pieces are hot glued together. If you are interested in making these let me know and I will be happy to show you. Going to keep this quick today so we can get as much as possible done today. Thanks for stopping by and have a great weekend. Tonya


Wednesday, November 30, 2011

Gift Wrap Made Easy

The sun is shining today which means I was able to get pictures taken of my newest project. I made a quick and easy gift bag out of the Deck the Halls Designer Series Fabric that is on sale until the end of today for only $3.98. That is 60% off the regular price. Also included is the Candy Cane Christmas Designer Fabric for the same price. The Sweet Stitches and Springtime Vintage Designer Fabrics are 50% off.

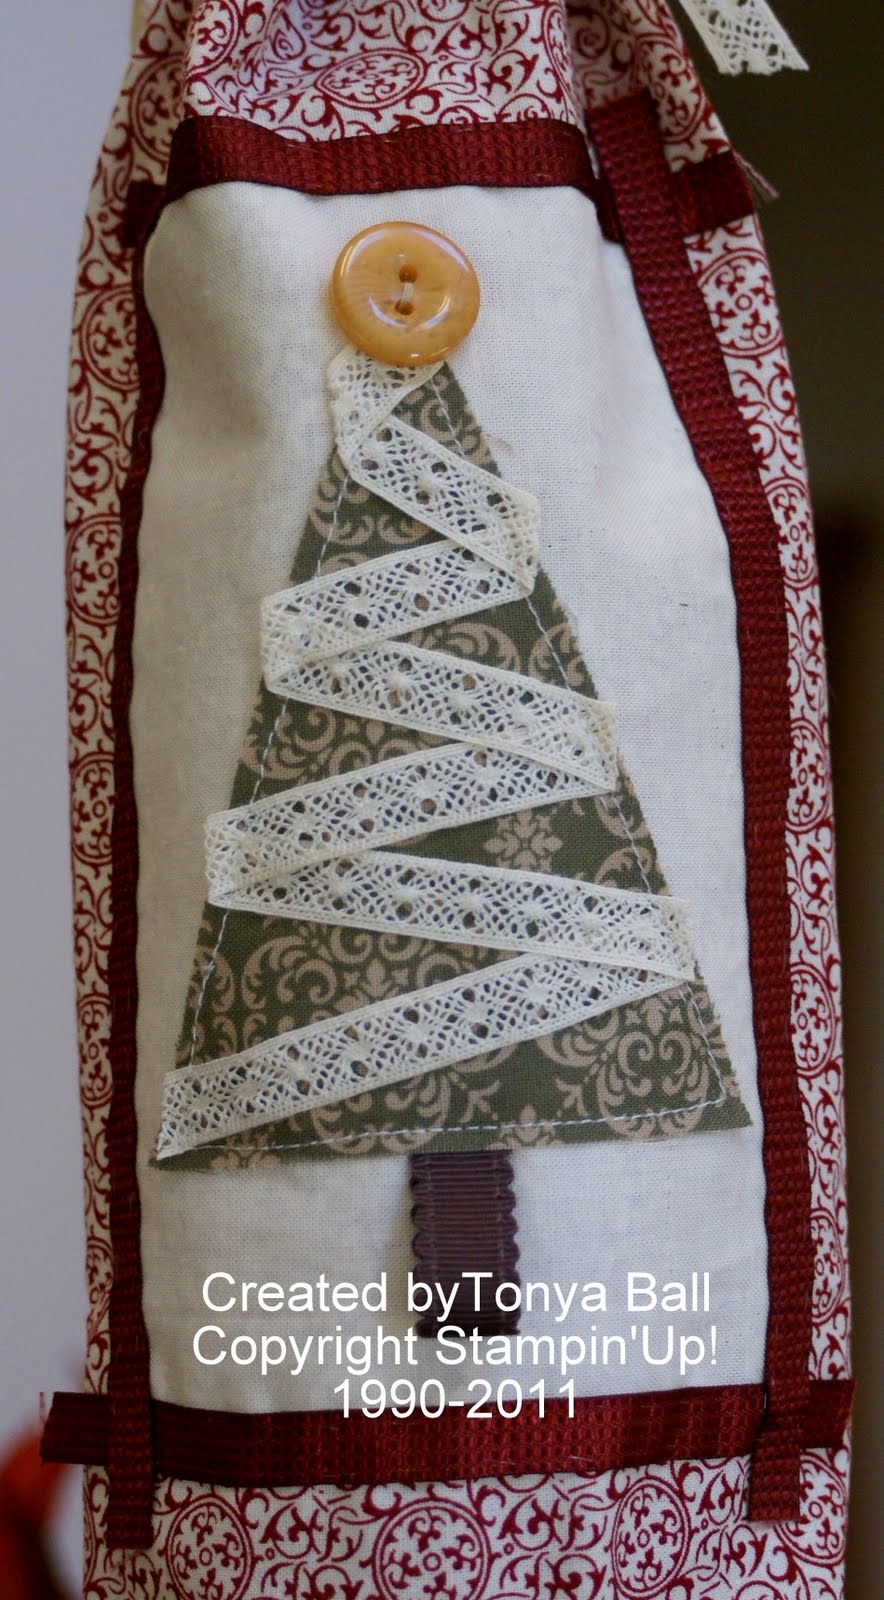
To make the bag I simply cut a rectangle that would go around my item to be wrapped. In this case it is a bottle but it could be anything (bread, cookies, or even numchucks that my 13 year old want to put in the bag) If you want to decorate the front I would recommend doing so before you sew your bag across the bottom and sides or you could add it later but it is more challenging. Ask me how I know? For the front of the back I used the Perfect Pennants Die to cut out the tree. There are three different sizes of triangles on the die so you can make several sizes of trees. I used the largest one. I added Chantilly Crochet Trim to the tree and a Chocolate Chip Scallop Ribbon tree trunk and stitched it to a off white piece of fabric. I added a More Mustard Button from the Regals Designer Buttons to the top of my tree. I then stitched the piece to my Cherry Cobbler fabric before adding the Cherry Cobbler Satin ribbon that was stitched by hand to cover the edges. Now to finish the bag fold your fabric in half with right sides together and stitch along the bottom and side. I then folded the top edge down and stitched it in place to give it a clean finished edge. For this bag I tied it shut with more Chantilly Crochet Trim but you can use any ribbon you like.


As an after thought I could have used the Cherry Cobbler Scallop Ribbon to edge the front. It is one of the four ribbons included in the 1/2" Scallop Dots Ribbon Bundle along with Basic Black, Chocolate chip and Old Olive for only $22.26 which is 30% off. I will place another order tonight for anyone still wishing to order from the Online Extravaganza all you need to do it call or email me before 11pm. Thanks and have a great day! Tonya

Tuesday, September 27, 2011

Another sewing project


Good morning, I hope you enjoyed your Monday and are ready for Tuesday. I am! I have a few more things to do for the wedding invite swap that I am in but they are coming along nicely. Today I wanted to share another sewing project with you that I did last week. This is a pillow that was made with Fleece and some leftover fabric. The B was cut with the Big Shot and the Serif Essentials Alphabet Dies. They make it so easy to personalize a gift whether it be a pillow or something else. I hand stitched around the B with a Blanket Stitch and other than machine stitching the sides thiss pillow was quick to make. I think a few more of these would be fun for the holidays. What do you think? Let me know and I will give your suggestions a try. Well, I need to go and get my little guys up for school but I will be back later today with card that I want to share with you so please stop by again. Have a great day! Tonya

Just a quick reminder that new Digital Downloads are available today. To see them you can take a look here.

Monday, September 26, 2011

Stocking Placemat

Good afternoon, I mentioned a while a go that I had a couple of sewing projects that I have been working on well today I am going to share the Christmas Placemat that I made a few weeks ago. The placemat is super easy to make and you can use the stocking for either a napkin or silverware. I used a prequilted Red fabric that I found at one of our local fabric stores and then used the Candy Cane Christmas Fabric to make the stocking and the edging. I used the smallest Scallop Square Die and the new Holiday Stocking die to cut the fabric. I did use an interfacing on the stocking to give it a little more durablity and I used a blanket stitch around the stocking except the top to attach it to the placemat. I hope you are see that better in the close up picture below. I am going to make a few more so that I have a set to either use in our home or to give as a gift. The stocking also can be used on felt to make a cute gift card holder or to put a treat for
a child in. I will be using this die a lot this year I have a feeling.
There is also a Stocking Accents Die that has other items that you can add to your stocking. The dies and Candy Cane Christmas Fabric can be purchased just by calling me or by going online and placing your order. If you have any questions please give me a call and I will be happy to help. Thanks for stopping by today and have a great day, Tonya


Tuesday, September 20, 2011

Spice Cake DSF


Good morning, it is early at our house and I am about to start my day again but before I do I wanted to share with you the final card we made at Beth's Workshop. I am really loving these three colors together and have another card in mind with the Gently Falling Stamp Set but haven't found the time to make it. The colors if you are wondering are Pool Party, More Mustard and Soft Suede in addition to using the Gently Falling Stamp Set we also used the Teeny Tiny Wishes Stamp Set. For accessories we added Spiced Cake Designer Series Fabric just like ribbon and also used Baker's Twine that has been distressed to hold the tag on. The tag was made with the Word Window Punch and the Modern Label Punch. The Scallop Square is made with the Big Shot and the Scallop Square 2 Die. It is a great die as there are two different sizes of Scallop Squares on it so you get more use. This card is easy to duplicate and some of the guests used Happy Thanksgiving on their cards so that they could send it for Thanksgiving. If you have any questions about the card please don't hestitate to ask. I am always happy to answer any questions you might have. That's it for today, I will be back tomorrow with another project to share with you. Thanks for stopping by and have a great day, Tonya

Wednesday, September 7, 2011

Gently Falling

Hello and Good afternoon! I got a chance to try out the new Gently Falling Stamp Set yesterday and I love how it looks when stamped. It is a two step stamp set and is so easy to use. For the colors I decided to pull out the colors of the new Spice Cake Designer Series Paper but I left the Pool Party out for this card. So the final colors are Soft Suede, More Mustard and Pear Pizzazz. I used a few Big Shot items and added just a bit of Soft Suede Taffeta Ribbon. The sentiment is from the Just Believe Stamp Set and was stamped on Confetti White Card Stock before it was punched out with the 1 3/4" Circle Punch. I can't wait to try out some other color combos and this will definitely be a set that you will see again during Stamp Club and my Septemeber Workshops. I also have a project start with the Spice Cake Designer Series Fabric so be sure and check back for that one. Well, I received some new goodies today from the UPS man so I am heaed off to design new cards. Wish me luck as I am not sure I am back to full creating power yet. :) Thanks for stopping today, Tonya


Monday, June 27, 2011

No Sew Hair Bow!


Good afternoon! I hope you are all well and dry after the storms that moved through last night. We fared better than some I know and hopefully it will stay dry for a while to help with all the flooding we are experiencing.

Today's post is a cute hair clip that I made using the soon to be retiring Table Setting Bigz XL Die which is 40% off until Thursday. I simple cut a piece of fabric and a piece of batting then swirled them and hot glued the end to hold it in place then I hot glued it to a hair clip and it is ready for that special girl to wear. It isn't to big of a clip but still a nice size to get wear in the front and hold back the side of your hair. I think it would look really cute with a trio of these on a clip or pin. You can also use this die for making place cards for a shower, wedding or just a more formal dinner. It also includes a tag which we used on this card. It really is a versatile die that I have enjoyed using. If you would like to order your own Table Setting Die don't wait Thursday is almost here. ;) Well, I have some design work to do so I had better get busy. We have two baseball games tonight so I only have this afternoon to work. Thanks for stopping by and as always let me know if I can assist you with any of your Stampin'Up! questions or needs. Tonya

Thursday, March 24, 2011

Springtime Vintage Hair Bow

Good afternoon. Today is a busy day out our house with our family getting ready for my boys music program tonight but I did want to share with you this Springtime Vintage Hair Bow that I made the other day. I used the Scallop Circle #2 Die and the Springtime Vintage Designer Fabric and a Night of Navy Button from the Springtime Vintage Big Designer Buttons. My daughter wore this one last night and commented on how light it was to wear. I am going to make more and if you would like to buy a hair bow contact me and I will work with you on fabric styles. Okay I am off to get a few more things done before I need to go get kids. Have a great evening and thanks for stopping by. Oh and don't forget to leave a comment on my Blog Candy to be entered to win. Tonya

Wednesday, March 16, 2011

Springtime Vintage Scissors Keeper

Just a quick post for the evening. I did get a chance to make the Scissor Keeper with the Springtime Vintage Designer Series Fabric. I had a sick child today so I let him pick which of the three fabrics I should use and he chose the Rose Red Floral print. I added a Rose Red Button to the front but other than that it is the same and yesterday's post. I also did some more sewing today but I will share that another day, probably Friday. I am starting new quilt and I have the first block done only 11 more to go. Thanks for stopping by and be sure and stop by tomorrow for a new card. Yes, I even got to stamp today! Hope your day was a great one, Tonya

Monday, February 7, 2011

Springtime Pin Cushion


Good morning! This is going to be a super quick post. I wanted to let you know that I am still around. ;) I just had a busy weekend and didn't find time to post. Friday night I had a workshop with Jennifer and her friends. I had a great time and I sure hope they did too! Saturday morning it was Valentine's with the kids. I love how creative kids can be when you give them some supplies and let them use their imaginations. This week is Stamp Club week. We will be having Club on Tuesday and Wednesday evenings at 7pm. I will be finishing up those projects today and will be posting them through out the week, but today I wanted to show you a quick pin cushion that I made over the snow days. There have been examples of these and I really can't say where I have saw them but I recently received the Springtime Vintage Fabric and I just had to cut it. I had a old jelly jar in my cabinet with a ring and lid so I was ready to make my pin cushion. I cut the fabric with the Scallop Circle Big Die and the Big Shot. I added some cotton balls for stuffing (couldn't find any polyfill in the house) and just attached the fabric with the ring. I did add a package of Springtime Vintage Big Designer Series Buttons to the jar for added color and interest. Quick and easy! It would make a nice gift for a person who likes to quilt or sew. Thanks for stopping by and have a great day, Tonya

Tuesday, December 28, 2010

Fabric Wreath


Good evening, I started this project some time ago and have had it finished but didn't have a chance to post it. I really thought I would get it posted before it was to late to order this wonderful fabric. This wreath is so simple and quick to make. All you need is a wire wreath form found at most craft stores and the Deck the Halls Fabric. I cut the fabric strips in 1" x 5" pieces then simple knotted them around the wreath form. I only single knotted them and alternated the three patterns as I went. I had debated on adding the Cherry Cobbler Seam Binding and still might but for now it is done and looks quite nice on my bureau in my Class room area. If you would like to make your own Deck the Halls Wreath then don't hesitate to give me a call so that you can order your fabric before January 3rd because after that it won't be available. I am off to watch a movie with my kids. Hope you have a great night and I will try and post again tomorrow. Thanks for stopping by, Tonya

Friday, December 10, 2010

Fabric Ornament


Good morning! Today's post is going to be short because I have lots to get done before I head off to judge a debate tournament. Judging will be a new experience for me so we will see how it goes. Now back to today's project. I love our Designer Series Fabric. I really enjoy sewing and like to change my crafting mediums from time to time so fabric is a great variety. This ornament that I made is really easy, no sewing and kids can help. Love the kids friendly crafts. All I used was a wire hanger (cut in half so that I could make two ornaments), the Candy Cane Christmas Designer Series Fabric cut into 1"x 5" strips and assorted ribbon. Make a circle with your wire then start tying the fabric on the wire. I used just a simple single know to make mine. Continue all the way around the wire alternating the fabric as you go. When you are done adding the fabric I added the Real Red Satin Ribbon to the top to hang the ornament and then added the Blushing Bride Ribbon in a few spots through out the fabric. I could have added more Real Red Ribbon but decided I liked it without. I did make a larger wreath version but I will share that another day. Well, I have to run. Have a great day and thanks for stopping by, Tonya

Monday, December 6, 2010

Cupcake Fun

Good morning and Happy Monday! I am going to start really decorating the house today so this post will be quick. I should have shared this with you last week when the items I used were on sale but some how it missed getting posted. At Convention this year they had some really cute cupcakes that were made from ribbon and paper that you could use as a gift box or to hold candy. I decided to recreate them using our Candy Cane Christmas Designer Series Fabric. I really love our fabric and the way it too coordinates with our ribbon, paper and inks. Oh and of course the buttons. How could I forget that. So the base is made with the Perfect Setting Bigz XL Die and the Candy Cane Christmas DSP (which is sold out, sorry any other paper would work too). This die is made to fit around a real cupcake so you can dress them up too for parties and such. I inserted a cupcake liner inside to old the treats then I cut out a circle to hold the "icing" on top and act as a lid. The "icing" is made of the fabric that was cut into strips then I stitched one edge and gathered it into a circle. I few more stitches to hold it in place and the layers were done. Then I stacked my two fabric circles on top of each other and a button was added with Glue Dots. I attached the fabric to the Card Stock Circle with the Big Shot Multipurpose Adhesive Sheets. Your cupcake is done now to decide what to put inside. Hmm, maybe some candy or jewelry. It was fun to make and I will be using the Perfect Setting die more to actually decorate cupcakes or maybe even little treat cups for nuts or mints. :) Thanks for stopping by, I am off to bring up the trees and start bringing boxes up from the basement. Have a great day and thanks for stopping by, Tonya

Tuesday, November 30, 2010

Fabric Flower Clip

I thought I would share a fabric project today since it is the last day to get the Candy Cane Christmas and the Deck the Halls Fabric at 50% off. That makes the fabric only $4.98. I love both the designs and have ordered more at the half off price. What can I say I love a sale. This flower is made with the Candy Cane Christmas Fabric and the Fancy Folds Flower Die. Oh and of course a Candy Cane Big Designer Button is perfect to finish it off. There is a clip on the back that allows you to use this flower in your hair on a purse or even your shoes. I just cut the two smallest sizes multiple times with the three different fabrics and folded, layered and stitched together. It really only took a short time to make and my daughter wore this one the other day. She mentioned that is was so light she forgot she had it on. If you have a little girl on your shopping list why not make her a hair bow and while you are at it you can also make a matching top with our fabric and a plain shirt. The possibilities are really endless when it comes to using our fabrics. Remember to stock up on the fabric while the price is still half off. Well, I am off to do more stamping. I didn't get the birthday card done yet that I had planned to do yesterday and I have a individual Christmas Card Class this afternoon that I need to set up for. We are seeing our first snow of the year here and I really hope that is stops soon. The kids are of course excited and are hoping they get enough to play in but for me it can wait until Christmas break to snow. Have a great day and stay warm, Tonya

Monday, November 22, 2010

Reindeer Food

Good afternoon! When I made this cute little basket last week I had no idea that it would be part of our Online Spectacular. What a great bonus treat. When my kids were younger we started a tradition thanks to my oldest son's preschool teachers' (Thanks, Miss Holly and Miss Kelly) to leave Reindeer Food sprinkled on our lawn to help them find their way to our house. The food consisted of Oatmeal and colored glitter. Well, we have since switched to colored sprinkles to be a little more environmentally friendly but the idea is still the same. I thought it would be cute to make a way to share this tradition with others. I cut the Real Red Card Stock with the Baskets and Blooms Bigz XL Die (which is on sale this week for $27.97) and the Big Shot. I used the same die and the Candy Cane Christmas Designer Series Paper to make the band around the bottom of the basket. Then I added a strip of Candy Cane Christmas Designer Series Fabric ( which is only $4.98 this week) around the handle. I love how the fabric and paper coordinate. To finish off the basket I made a tag from a Baja Breeze Scallop Circle Punch, Blushing Bride Circle Punch and a cute little reindeer stamped with Early Espresso from the Jolly Bingo Bits Stamp Set. I colored in the reindeer's nose with the Real Red Stampin' Write Marker to make him look more like Rudolph. Inside is the Reindeer Food. Simple and the basket is big enough to hold hot chocolate and a few extra's to give as gifts as well. To order all the supplies you can order online from me or you can contact me and I will help you place your order. Thanks for stopping by and have a great day, Tonya

Friday, November 19, 2010

Countdown Til Christmas!


Good morning! I am so happy to finally be able to share this project with you. I started it several weeks ago and it has been one of those projects that just kept changing and evolving. After buying the Metal Flashing and making the Message Board from this post. I thought it would be fun to make a Countdown Til Christmas Board. I had several ideas but only a few remained on the finished project. I do like how it turned out and I need to figure out a place to put it in our house. The base is Metal Flashing cut to a 10" x10" size. It was then covered with a sheet of Deck the Halls Designer Series Paper. I used the Big Shot and cut out the Letters with the Timeless Type Junior Alphabet Set and Cherry Cobbler Card Stock. The letters were attached with 2 Way Glue. I cut out several of the flowers in the upper corner and layered them to add more dimension. Then I added Champagne Glass Glitter to the center of the poinsettias. I used Crystal Effects to attach the Glass Glitter. It holds better and you don't have as much flake off. For the center of the board, I used another piece of Metal Flashing and cut out an oval with the Frame, Oval Scallop. On the back of the oval I added Deck the Halls Designer Series Fabric that was cut with the Tasteful Trim Bigs XL Die so that is was Scalloped on one edge. The fabric is held in place with Sticky Strip and then a card stock oval was added over the back to give it a more finished look. The numbers are cut out of Magnetic Sheet and Always Artichoke Card Stock with the Alphabet Simple Numbers Bigz Die and the sponged with Always Artichoke Classic Ink and Early Espresso Classic Ink. All the numbers are stored on the back so you can switch it out everyday as Christmas gets closer. The Big Shot was used quite a bit but I really love that tool so I don't mind at all. :) Well, I have a Christmas Card Stamp A Stack tomorrow and while the cards are designed I haven't cleaned my Class room in a while and the card stock is not cut yet. So I had better run and get busy so that I don't have a late night tonight. I hope you have a great day and thanks for stopping by today. Tonya