

Showing posts with label Quilting. Show all posts
Showing posts with label Quilting. Show all posts
Wednesday, February 27, 2013
Happy Birthday Quilt
Tuesday, February 26, 2013
Vintage Print Quilt

Thursday, March 22, 2012
Dresden Plate Quilt
Good morning, while the sun was trying to shine this morning I took a few pictures of some projects I have been working on and wanted to share the quilt top that I recently finished. It is not quilted yet but I just couldn't
wait to share. I used the super cute Twitterpated Designer Fabric from the Occasions Mini and the Dresden Designs Bigz L Die also from the Mini to make the quilt. With the Big Shot and the Die it was a quick process to cut all the pieces for this quilt and the best thing is that all the petal pieces are the same size because the die cuts them for me. I used the small sized petal which is 2 3/4" x 6 1/8" but there is a large option on the same die which measures 3 1/4" x 7 5/8" if you want a larger petal. 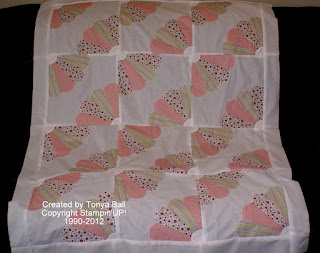
I have added a closer picture so you can see just a bit more of how I made this quilt. I am planning on finishing it and think it would make a great baby quilt. What do you think? Would you like to give quilting with the Big Shot a try? If so contact me and I will be happy to show you how easy it really is. Thanks for stopping by today and for taking a look at my quilt. Have a great day, Tonya

Tuesday, July 26, 2011
Yet another Quilted Bag

Good afternoon, I seem to be in a stamping slump right now. I guess because I don't have a upcoming project that I need my MOJO has taken a few days off and instead of show you the last Christmas card I thought I would share with you another Teacher's bag that I made in May. I really like the prints I used in this bag and should go back and see if they have any more. I am in the mood to sew so maybe I should just switch for a day or two. This bag uses the Scallop Square Clear Die which allows me to cut out several layers at one time and makes getting to the sewing stage so much faster. Would you like to see how the Big shot works with fabric, metal or cork? Give me a call and we can schedule a private demonstration. Enjoy your day and thanks for stopping by, Tonya
Monday, March 21, 2011
Star Quilt Update

Happy Monday Morning! I am headed out soon to go grocery shopping but before I did that I wanted to give you an update on the quilt. It has come a long way since the previous post and while the top isn't finished yet, it is getting closer. I am also going to do some fabric shopping while I am out. :) The quilt has came together pretty quickly but I am trying to decide what to add next. I feel like it needs another color around the whole thing but am not sure what. Any suggestions? Leave me a comment if you have an idea. I would really love to hear from you.
I am also hoping to do some stamping today and finish up a few projects that are started on my table. If that works out then I will start posting those tomorrow. Don't forget that Sale-a-bration will soon be ending if you haven't placed your orders yet to receive your free item there is still time. Give me a call I would be happy to help you. Well, I am off to the store. Thanks for stopping by and have a great day, Tonya
Friday, March 18, 2011
Big Shot Star!
 Good morning! I love my Big Shot and use it all the time in fact I probably use it every time I am stamping but this week I have been using to for fabric projects including today's post. I am currently working on a quilt. It isn't going to be a big quilt only about 36" x 48" but a quilt none the less. I have four of the blocks sewn and the other 9 are ready to start sewing which I will be working on today. For this project I used the 5 Point 3D Star Bigz Die and the Big Shot. I cut 5 star points per block and used a Patriot themed fabric. I will be sure and take a picture of the finished quilt top (hopefully sometime this weekend) to share with you. Have you every thought about buying the Big Shot? Did you know that as a Demonstrator you can get the Big Shot for 30% off on your first Stampin'Up! order (there are conditions that must be met for this to apply) or you can order the Big Shot and receive free Sale-a-bration sets! Even as a demonstrator you will receive Sale-a-bration reward while making a purchase. So why not give me a call and see what Stampin'Up! has to offer you. Thanks for stopping by today and I hope you have a great day, Tonya
Monday, November 1, 2010
Christmas Quilt

Hello, I really can't believe how quickly October went by. I had a workshop last week with Carla and some friends and we made Christmas Cards. One of my favorite ways to showcase our Designer Paper is with the Quilt Cards. They are easy to make and with our Impressions Embossing Folders you can add some texture that makes the quilt look even more real. The Designer Paper I used is Deck the Halls and is in the Holiday Mini. The base of the card is Always Artichoke Card Stock which gives the card a nice rich look. We used the 1 3/4" Square Punch to punch out the Designer Series Paper then attached it to a Whisper White Base and ran it through the Big Shot with the Top Note Die. The Impressions Folder that I used is the Petals A Plenty Folder. We used Cherry Cobbler 1/2" Seam Binding around the middle of the Quilt. The sentiment is from two stamp sets and I showed the guest how to use the Stampin' Write Markers to ink up the different parts of the tag as well as omitting. We used the Chocolate Chip, Always Artichoke and Cherry Cobbler Stampin' Write Markers to ink up the tag image from the Tags Til Christmas Stamp Set and omitted the to and from. Then we used the Teeny Tiny Wishes Stamp Set and added the Merry Christmas to the tag. After stamping the tag we punched it out with the Decorative Label Punch. Did you know that you can order the Decorative Label Punch and the Tags Til Christmas Stamp set together and save now through Dec. 16. On the inside of the card we added a Very Vanilla Top Note so that it made the card easier to sign. With one package of Always Artichoke and Very Vanilla Card Stock and Deck the Halls Designer Series Paper you can make 48 Christmas Cards! Wow that is a great way to get started on your cards. I will be back tomorrow with another project and look for some blog candy later this week when I have my 400th post. Thanks for stopping by and if you have any questions please let me know. I am happy to help. 'Til Tomorrow, Tonya
Friday, September 24, 2010
Convention Quilt
 What have I been working on for the past three days? Well, this is it, it is not finished yet but I am at a stopping point for now. Remember back before Convention I was going to participate in a Quilt Block Swap? Well, I was a little unsure how I would make my quilt. I didn't know if I "could" work all the different colored blocks together. I am a matching kind of person, slight shade differences bother me. So after I looked through my quilt blocks I set them aside and thought someday I will give it a try. Well, two months past and I still had not found the motivation until the other day. I was blog surfing as I sometimes do and I came across a new blog and what did I find but a completed quilt from the swap blocks. It inspired me to pull mine out and give finishing this project a try. I laid out the blocks and played with different positions and combos before finally settling on this one. It isn't as big as I had anticipated because I didn't use any duplicate prints and I had a few extra that didn't get used just because I didn't have enough for another row but I do think it will make a great throw size for curling up under during the winter months. The blocks are super quick to make with the Big Shot and the Flower Bigz Clear Die. You can cut 8 pieces of fabric at once! The blocks are 8x8 squares for a size reference. Now i just need to decide if I am quilting and finishing it myself or having someone else do it for me. I really want to try and do it myself but am worried about how much time it might take. If I do quilt it myself do I machine quilt it or hand quilt it? So many decisions to make. If you would like to learn more about the Big Shot and quilting with it please contact me and I will be happy to help. Have a great weekend, Tonya
Friday, June 4, 2010
Top Dawgs Bag
 Hello, for my second post of the day I wanted to show you a sewing project that I completed last month. I made book bags for all of my children's teachers and this was my daughter's fabric choice for her teacher. The class news letter is The Top Dawgs and she thought that dog fabric would be very fitting. I used the Big Shot Die Cut Machine and the Scallop Square Clear Die to cut out all the fabric minus the straps. Then just a little batting and a sewing machine and you are ready to sew. I am now looking at the Big Shot Dies a little differently trying to plan out a quilting project as well as paper projects. If you would like to learn more about the Big Shot and all the different project ideas then contact me. If you don't have a Big Shot yet we can set up a demonstration. Thanks for stopping by again today and if this is your first stop to my blog today then be sure and scroll down to the card I posted this morning.
Have a great weekend, Tonya

Sunday, April 11, 2010
Card Clutch

Friday, April 9, 2010
Messenger Bag!
 I have been sewing again and I am super excited about the messenger bag that I am sharing with you today. Last week I mentioned that I had a project that I had completed and couldn't share and this is it. I was asked to make this for a birthday girl and I really wasn't sure what I was going to make until I started it. I was asked to make a messenger style bag with a longer strap that would hit about waist length. One of the things I added to this bag is the flap that allows it to close and also it is reversible yes reversible! How cool is that. I added buttons on the inside and out so that it can easily be closed. The bag is of course made with the Square Scallop Die and the Big Shot. There are 22 squares in the purse so you need to cut out 44 total because each is double sided. This is a great size for a every day bag or for a teenager.You can see from the pictures that one side is smooth and the other has the scalloped edge that will fray as you wash it. Both are a different look for your different moods. which do you prefer? If you would like a messenger bag of your own contact me and I will be happy to make one for you.
Thank you for stopping by my blog today and let me know if you have an idea fo
 r a bag. I love a challenge and will be happy to give your idea a try. Now back to more stamping, Tonya
Wednesday, March 31, 2010
Butterfly Bag!
 I have been sewing again and with the orders that I have right now I will be doing even more. This bag is the same size as the Baseball Bag that I showed you yesterday with a definite girl look. I love the look of this fabric and since it features butterflies, I just couldn't resist adding a butterfly pin to the bag. Now it is a little hard to see so I have a close up for you. I used two different sizes of butterflies made with the Stampin'Up! Beautiful Butterflies Bigz Die. This die will also easily cut through fabric and the batting. I hand stitched the butterflies and then stitched them together and added pink beads from the Pink Duo Beads. I really think this is a nice touch and the pin can be removed and added to a hat, h
 eadband or shirt. The bag is made with the Clear Scallop Square Die and the Big Shot. Be sure and come back tomorrow when I will be announcing a new special from Stampin'Up! for both customers and hostesses for April. Until have a great evening and thanks for stopping by. Tonya
Tuesday, January 19, 2010
More Big Shot Quilting!
 Good morning, the morning has flown by. I took my oldest to High School today to shadow a friend and see if she likes this High School. Which brings me to today's post Quilting with the Big Shot is becoming a new hot trend. It is so quick and easy to cut out consistent sized shapes which makes quilting that much easier. I have done some quilting before I really got into stamping. It is a fun hobby that I really enjoy but I have found over the years that stamping has taken a front seat in the crafts that I do. So when I saw that the Big Shot can be used to cut fabric I realized that this was a great way to combine both crafts that I enjoy. I am looking forward to trying more quilting options but for today I am sharing another Scallop Square Purse. This one is a little smaller than my first. I only made it 2 rows high by 3 rows. I had some fabric leftover from a Saint Patrick's Day shirt that I had made years ago for my kids and since the school my daughter is attending today just happens to be the fighting Irish I thought a Irish purse was perfect. I cut all the squares over the weekend and finished the purse in about 2 1/2 hours. I am really happy with the way it turned out and am all ready looking at fabric to start another one. Now my daughter is actually not keeping this purse for herself, although if this is the school she decides to attend I have no doubt I will be making another one but this one is going to be a gift for the w
 onderful girl that is allowing my daughter to follow her all day. I hope she enjoys it. What a great way to show off your school spirit.
If you would like to learn how to make your own Scallop Square Purse or are a quilter and would like more information about using the Big Shot to quilt with please contact me. I would be happy to help you. I will share other quilting projects as I make more but don't worry this will not become my main focus but rather another fun creative outlet. Thanks for stopping by and have a great day, Tonya
Supplies: Stampin'Up! Supplies Big Shot Die-Cut Machine (113439), Stampin'Up! Scallop Square Bigz Clear Die (115950), Paper Snips (103579), Craft & Rubber Scissors (103179), Non Stampin'Up! Supplies Various Fabrics, Batting, Sewing Machine, White Thread
Thursday, January 7, 2010
Quilting Made Easy
Year s, ago when we first moved back to Missouri I made this Rag Quilt the traditional way. I cut all the squares with my Rotary Cutter and Mat then sew this heavy and warm quilt. The squares took quite a while to cut even doing a couple of layers at a time and of course I had to make sure that I was cutting each one sqaure so they would match up. This quilt is made of jeans that my family had since disgarded and flannel. The back of the quilt is all red and red plaid flannel. I was and still am pleased with the result. Now you might be asking yourself what does this have to do with stamping will truthfully not much but the next project that I am going to show you uses Stampin'Up! Supplies to allow you to make a Rag Quilt so much faster and easier.
 s, ago when we first moved back to Missouri I made this Rag Quilt the traditional way. I cut all the squares with my Rotary Cutter and Mat then sew this heavy and warm quilt. The squares took quite a while to cut even doing a couple of layers at a time and of course I had to make sure that I was cutting each one sqaure so they would match up. This quilt is made of jeans that my family had since disgarded and flannel. The back of the quilt is all red and red plaid flannel. I was and still am pleased with the result. Now you might be asking yourself what does this have to do with stamping will truthfully not much but the next project that I am going to show you uses Stampin'Up! Supplies to allow you to make a Rag Quilt so much faster and easier.
I saw these Rag Quilt Purses in various shapes and sizes on several blogs and recalled how much fun it was to make the quilt above, so I decided to give it a try. I used my Big Shot (113439) and Stampin'Up! Scallop Square Bigz Clear Dies (115950) to cut out all my fabric squares. I used two layers of fabric and some batting between the layers. For the Straps and the closure I watched Angie Juda's Video that gave directions and dimensions. After sewing the purse the fun part begins. I cut all the scalloped edges between the scallop being careful not to cut into the seam. Then you wash your purse and it is ready to use. I made this one for my Bible Bag for Church and  Prayer Group but I like it so much I have started using it for my everyday purse. My daughter wants one for Church also and I am thinking about making a blanket. It is something a little different than my stamping but just as fun. If you would like your own
 Prayer Group but I like it so much I have started using it for my everyday purse. My daughter wants one for Church also and I am thinking about making a blanket. It is something a little different than my stamping but just as fun. If you would like your own
 Rag Quilt Purse contact me as I have decided to make these to sell. If you are local we can work together to pick out the fabric you like and the pattern of the purse. As always have a great day , thanks for stopping by and stay warm! 'Til, next time, Tonya
Subscribe to:
Posts (Atom)


