Monday, November 30, 2009

More Snowflakes!

Good morning, before I go on to today's project let me just remind you that today is the last day to take advantage of the fantastic Online Extravaganza Deals. Please call me if you would like to place can order. I don't want you to miss out on the great deals.
Now onto today's project. We made these baskets at this month's Stamp Club but it just didn't seem finished until I added the Small Flat Cellophane Bag (103104) some Candy Cane Kisses and Mistletoe Ribbon (116792), but I am getting ahead of myself first I should tell you how we made the basket. These baskets are easy to make with a little help from the Big Shot and the Stampin'Up! Baskets & Blooms Bigs XL Die (113484). This die cut and scores the two sides for the basket and the bottom in no time. I used Real Red Card Stock (102482). After you cut out the sides and bottom you need Sticky Strip (104294) to assemble the basket. Now if you want to add an embellishment like the snowflakes you should to that before you attach the two sides into a circle. It is easier to pierce the hole when the project is flat. (Wonder how I found that out) To make the snowflakes I used the Jumbo Snowflake Punch (116628) and punched out one from Whisper White Card Stock (100730) and one from Soft Suede Card Stock (115318). I used a small Clear Rhinestone Brad in the center of the snowflakes. After we finished the basket we used the Shimmer Paint Champagne Mist (116806) that I added to Rubbing Alcohol and made a Shimmer Spray. This adds lots of sparkle to a project. I hope you can see it better on the close up picture. Remember that the Shimmer Paint is only available until January 4. Wouldn't these baskets make a great gift for a coworker or for a goodie bag for you child's classroom.
I am off to work on Stamp Club Projects for December. They meet the 3rd and 8th. If you are interested in learning more about Stamp Club and the benefits of joining email me and I will be happy to answer your questions. Have a great day and thanks for stopping by. Tonya

Sunday, November 29, 2009

Time is Running Out!

Good evening, I hope that you all enjoyed your Thanksgiving. It was a great to spend time with my family. I just wanted to remind you that tomorrow is the last day to purchase any of the great Online Extravaganza Items. This deals are really to good to pass up and make great Christmas gifts for the crafter in your life or maybe even a gift for yourself. You may purchase online or by contacting me. I will be happy to place an order for you, just email or call me. Thanks for stopping by and since I just can't post without showing you something. I wanted to share this super fast Digital Scrapbook page made with you guessed it My Digital Studio and the newest download Christmas Cocoa II (120880). I just added the pictures to this page and a little bit of journalling and it was finished. How easy is that. If you take digital photos I really encourage you to give My Digital Studio a try. See you tomorrow, Tonya

Wednesday, November 25, 2009

LIghted Blocks

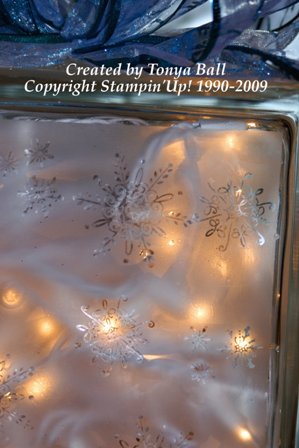
Good morning, before I run out to do my pre Thanksgiving errands and see my kids skate, I thought I would share a project that I made yesterday. I love making these lighted glass blocks and giving them as gifts. I have made them with snowflakes, the Holy Triptych stamp set and personalized them with family names. They just require a little stamping, embossing then etching, but before I get to far ahead of myself lets start at the beginning of the project. I purchase the glass block from a local home improvement store. These blocks are the ones that you see walls made out of in homes. Next my husband drills a hole in the side of the block with a special glass drill bit. After I have rinsed out all the glass pieces and let the block dry the fun part begins. You will pick the stamp set of your choice. I used Serene Snowflakes Stamp Set (115438) from the Holiday Mini and after cleaning the front of the glass block I stamped with Versamark on the front of the block. After stamping all the snowflakes that I wanted I poured Silver Embossing Powder over the entire front of the block and poured the excess into the Powder Pal Tray. I then used the Heat Tool to emboss the snowflakes. It really doesn't matter what color of embossing powder you use as it will be removed later. After you have embossed the snowflakes let the block cool. It will get hot while you embossed the images. Then I use painters tape and mark a square around the images. I then add Etching Cream (found at most craft stores) to the taped off area and let it set for 10 minutes. Be sure and read the directions on your etching cream and don't get it on your hands. After the ten minutes I simple rinse off the cream and most of the embossing will also come off too. If it doesn't then simple wash the front with a wet paper towel. I then add a string of Christmas lights and a bow and the block is finished and ready to decorate your home or give as a gift.

I have added a few extra pictures today because it is difficult to see the snowflakes. The top picture is a closeup and then the bottom is with the Christmas lights turned off. I hope you enjoyed today's post and if you are interested in making or buying one of these glass blocks please contact me. I do take orders for individuals who would like a personalized block. Thanks for stopping by and I hope you all have a wonderful Thanksgiving filled with great food but most of all with family and friends. Tonya


Tuesday, November 24, 2009

Quick and Easy Christmas Card

I have been playing around with some new downloads for My Digital Studio and I thought I would share a quick Christmas Card that I made. Now when I say made that is a very loose term. I simple added my kids picture and rearranged, added a few snowflakes, made a few of them more opacity and that was it. Really I could have stopped at the picture but I wanted to see what I could play around with. The inside of the card has some snowflakes inside and you can add your own personalized sentiment. This download is the Icicle Photocard Digital Kit (120882) and cost only $3.95. If you haven't purchased My Digital Studio then you need to ask Santa to bring you it for Christmas and if Santa needs a little help be sure and have him call me and I will be more than happy to get the order place, wrapped and ready in time for Christmas.
Thanks for stopping by and let me know if you would like to see more My Digital Studio Projects. Tonya

Cookies Anyone?

Good morning, everyone! Yesterday was a great day, we had our school had a Chili Supper last night at our last home basketball game. There was a great turnout and it was so much fun to see our team in action. Enough about my day and on to today's project. This is a super quick project that makes a plan Charger Plate really come to life. This plate took all of five to ten minutes if even that to complete. I used the same White Decor Element Sheets (114335)from yesterday's post and cut out snowflakes using the Snowflake #2 Originals Die (113460) and the Snowflakes #2 Sizzlits Dies (113449). I applied the larger snowflake to the center of the Charger Plate and then the smaller ones around the edge of the plate. Now all it needs is cookies and it would make a great gift for Neighbor, Coworker or Friends. One thing about adding the snowflakes the plate is not dishwasher safe.
Remember the Online Extravaganza sale is still going on until Nov. 30. You can place orders online through my Website or I can place in your order for you. Just let me know I am always happy to help. Tomorrow I will be back with another Holiday gift giving idea. Until then have a great day, Tonya


Monday, November 23, 2009

Christmas Candle

I just love to give and recieve handmade gifts. I think it show that you care enough to take a little extra time and really put something of yourself into a gift. I also like to dress up something ordinary and make it a little more special which brings us to today's project. I bought this plain red jar candle last year on Clearance at my favorite home improvement store. I was looking through my items to be altered and decided it would be perfect. I started with the Big Shot, White Decor Element Sheets (114335) and the Snowflakes Set #2 Sizzlites Dies (113449). I cut one of each of the four Snowflakes from the Decor Elements Sheets and applied one to each side of the candle. I took the Red Rhinestone Circle Brads (109110) apart and used a Mini Glue Dot to adhere them to the center of each snowflake. I added Mistletoe Ribbon (116792) to the top of the jar and then decorated the top of the candle lid. For this a used the Scallop Circle #2 Big Shot Die ( 113469) and Real Red Card Stock (102482). The larger of the two Scallop Circles is a perfect fit for the lid. I then added some Faux Snow to the edges with 2 way Glue and then a White Snowflake from the Clearanced Felt Flurries Set with a Red Rhinestone Circle Brad added to the center. I attached it with Mini Glue Dots and this gift is ready to give. I could add a simple gift tag to the ribbon if I don't want to worry about wrapping it.
I will be back tomorrow with another gift idea. Be sure and check out the Online Extravaganza and let me know if you would like to place an order. I will placing one later today and if you are local you can save on shipping by adding it to my order. Thanks for stopping by. Tonya


Online Extravaganza

Would you like some great prices on your Stampin'Up! supplies? Do you have a long Christmas list of crafters? Then be sure and check out the Online Extravanza Sale that Stampin' Up! is having today thru November 30. For a complete list of items be sure and check out my Business Website by clicking on the picture above. If you have any questions or would like help placing your order please contact me. I am always happy to help.
I will be back a little later with a handmade gift idea for all those people on your Christmas list.

Tuesday, November 17, 2009

Holiday Decor


Good Morning, with yesterday's snow I am in the mood to start decorating for Christmas and while I haven't started yet with the main house I have started putting some Christmas items out in the Classroom area. So today I am going to share a super quick and easy project with you that will add extra holiday spirit to your home or workspace. I started with an frame I had setting around my house any 5"x7"frame of your choice will do. I added a piece of Christmas Cocoa Specialty Paper (116770) to act as a matte and fit inside the frame. Before I added it in the frame I cut a Big shot Top Note (113463) from Soft Suede Card Stock (115318) and added it to the center of the Christmas Cocoa Specialty Paper. Then the last step is to add the Jingle All the Way (117507) to the center of the glass. I used the smallest size which measures 3" x 3 5/8" in Real Red that only cost $3.50. If you haven't tried out Definitely Decorative line then this is a great way to start. They are so much fun to use and so easy too! I may still add a bow at the top but for now I will leave it as is. This would make a great gift for a friend or loved one. If you would like more information about our Definitely Decorative items please give me a call or drop me an email. I would be happy to show you other items that I and my customers have done.
Also if you are interested in either of my Christmas Stamp A Stacks the first one will be this Friday at 6:30 at my house. You will make 12 cards for $20. I have four card designed and you make 3 of each. Hope to see you there. Have a great day, Tonya

Monday, November 16, 2009

Let it Snow?

Good morning, what a busy weekend we had at our house. Between a camp out for oldest son and a gymnastics meet for darling daughter we weren't home much. Today I had planned to share with you our Stamp Club card for this week. I find it very fitting that it would be snowing when I posted this picture. I do like snow in very small amounts. One good snow for Christmas break is great by me but snow in the middle of November is just to early, but as I watch the ground turn a little whiter it look like we will be getting our first snow. Enough about snow lets move onto the card. I really wanted to show off our Shimmer Paint for this month's club projects so both use the Shimmer Paint in different ways. I started with a Real Red Card Stock (102482) Base and stamped the three smaller snow flakes from Serene Snowflakes Stamp Set (115438) in Versamark (102283) randomly over the top of the card. I then added the Striped Designer Paper from the Christmas Cocoa Specialty Paper (116770). This paper is so pretty and shimmery it goes perfectly with the Shimmer Paint and I love the flocked designs that are also part of this Designer Series Paper Pack. I did use the Scallop Edge Punch (112091) on the top edge of the Designer Series paper before I added it to the card. I added the be merry which is from the Warm Words Stamp Set (115108). It was stamped in Real Red Classic Ink (103133) and then punched out with the Large Oval Punch (107305). The main image is the largest snowflake from the Serene Snowflakes Stamp Set. I inked up the image with Real Red Classic Ink (103133) and then added Frost White Shimmer Paint (116854) with a Sponge Dauber (102892) over the Real Red Classic Ink. For club to save time I will mix a little Frost White Shimmer Paint with Real Red Reinker (103287) to make Real Red Frost Shimmer Paint to add directly to the stamp with a sponge dauber. This will save having to clean the stamp every time we ink it up and make the project go a little faster. After stamping the snowflake I added a Soft Suede Card Stock (115318) background layer. Before I added it to the card with Stampin' Dimensionals (104430) I punched a slot in the lower left corner with the Horizontal Slot Punch (105089) this allowed me to thread my Whisper White Taffeta Ribbon (109070) through the slot and tie a knot there. The shimmer is a little hard to see in this picture but those of you attending Stamp Club tomorrow night will get to see it in person.
Thank you for stopping by today. Stay warm and happy Stampin', Tonya

Tuesday, November 10, 2009

Christmas Pines

Good morning, as promised I have another Pattern Pines Card for you today. Last week you may remember I shared a Snowman card that used nontraditional colors based on a recent shopping trip. Well today those colors are back. I kind of like these colors for a little different Christmas feel. The base of the card is Real Red Card Stock (102482) and I stamped the Poinsettia corner image in the top left corner in Real Red Stampin' Write Marker. The Trees were inked up with the Pixie Pink (105112), Green Galore (100048), and Real Red (100052) Stampin' Write Markers and then stamped once on the Whisper White Card Stock (100730) and then again on a scrap piece of Whisper White Card Stock (100730)and cut out to add dimension to the project. I added a layer of Green Galore Card Stock (101768) for a background matte. The be merry is again from the Warm Words Stamp Set (115108) and is inked with the Pixie Pink Stampin' Write Marker (105112). I punched out the be merry with the Modern Label Punch (116630) and then layered it on top of a Large Oval Punch (107305) made with Pixie Pink Card Stock (105121). A little double stitched ribbon from the Mistletoe Ribbon Originals (116792) and this card is complete. Don't forget you have until Thursday to leave me a comment on yesterday's post to win your own Pattern Pines Stamp Set. I am off to take my kids to school. I hope you have a great day and if you are coming to my library class tonight I will see you there. Thanks for stopping by and have a great day, Tonya