Showing posts with label Clear Mount. Show all posts

Friday, March 29, 2013

Designer Type Photopolymer Stamp Set

 
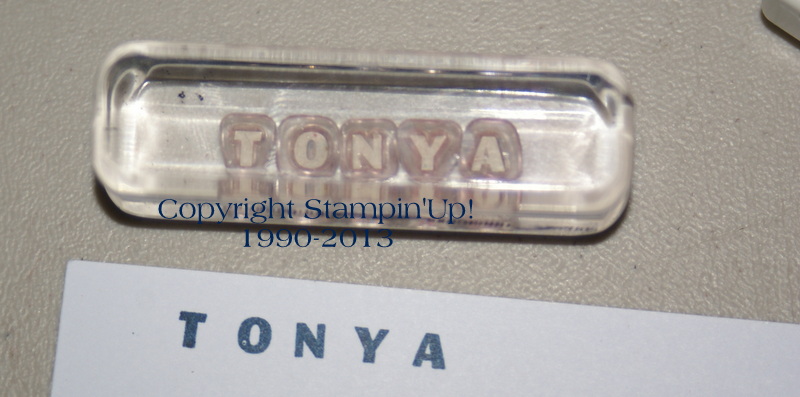
My new Designer Type Photopolymer Stamp Set arrived recently and while I haven't had a chance to make a card with it I did want to ink it up and see what my first impressions were. I decided to take a few pictures to share with you so you can get an idea of how this new stamp set inks, stamps and so on. The top picture is of the stamp set after I took it out of it package. They do not come in the clear cases like our other stamp sets but rather in a plastic sleeve and are between to clear pieces of plastic. The black outline that you see in the picture above is on the plastic not the stamps themself. The next picture is of a stamped image. I placed the letters on the clear block with not spacing betweent them. So the stamped image is what you would get if you just line up the images. If you want the letters closer together you will need to stamp each letter individually.

Below is the stamps while on the block. The first picture is of them clean and the second is with the ink on them. They are see through so make sure you put them back on their sheet after stamping as they could easily get lost. They are super sticky and I had no problem with them sticking to the block. They are a good small set of letters for stamping names and such. The image is crisp and clean when stamped and I used the new foam pad in Midnight Muse.  I haven't inked up any of the other images but will be sure and share the results when I do. I hope this is helpful to those of you that are considering the purchase of this set. Please let me know if you have any other questions. Thanks and have a great day! Tonya


Friday, February 19, 2010

More Vintage Vogue


Good morning, what a dreary yucky day. I hope that this weather doesn't affect all the activities that our family has planned for this weekend. I really want Spring to arrive, but enough about the weather. I have a new card to share with you today. It has a lot of detail to it and was fun to make. Lets get started with the supplies: Vintage Vogue Stamp Set ( wood mount 117690 or clear mount 118598), Very Vintage Jumbo Wheel (117693), Jumbo Handle (103661), Kraft Card Stock (102125), Not Quite Navy Card Stock (101722), Rich Razzleberry Card Stock (115316), Very Vanilla Card Stock (101650), Old Olive Classic Stampin' Pad (102277), Rich Razzleberry Classic Stampin' Pad (115659), Not Quite Navy Classic Stampin' Pad (103008), Close to Cocoa Classic Stampin' Pad (103139), Old Olive Stampin Write Marker (100079), Close to Cocoa Stampin' Write Marker (100072), Kraft Taffeta Ribbon (109068), Eyelet Border Punch (113692), Crimper (101618)
The base is of course Kraft Card Stock which I rolled the Very Vintage Wheel across the bottom of the card. I then used the Eyelet Border Punch to make a Not Quite Navy Strip to go across the center of the card. This was Crimped before I added it to the card. I used Sticky Strip to attach the Not Quite Navy Card Stock to the card folding it as I went to give it a ruffled looked. I then added the Kraft Taffeta Ribbon around the card and tied it with a knot. I stamped the Life Happens. Love Helps. first on the Very Vanilla Card Stock then used the Stampin' Write Markers to ink up the vine and stamp it twice on the Very Vanilla Card Stock. I then stamped the flowers and leaf on scrap Very Vanilla and cut them out with my paper snips. They were added to the card with Mini Glue Dots and Stampin Dimensionals and there you have the finished card. It looks more complex than it is.
Well, I have a long list of things to accomplish today and one of them is to stamp. I haven't found much time to do that this week so I need to get back into my craft room. Have a great weekend and be sure and stop by and see what I have been making. Thanks for stopping by, Tonya

Tuesday, February 16, 2010

I like to move it move it!

Hello to all! Hope you are having a great week. Today I would like to share with you a project we did last week at Stamp Club. Now I didn't come up with the idea of using the Movers and Shapers Die and just cutting out half of it myself. I saw a video on a blog that I follow, Stamping with Roxy. After I saw the video I just knew that I had to share it with my Stamp Club ladies so that they would use their Movers and Shapers Dies more. So here are the supplies we used for the card. Big Shot Die Cut Machine (113439), Movers & Shapers Curly Label Die (114506), Punch Windows Magnetic Movers and Shapers (115953), Taken with Teal Card Stock (101584), Taken with Teal Classic Stampin' Pad (103257), Pumpkin Pie Classic Stampin' Pad (105216), Whisper White Card Stock (100730), Eyelet Border Punch (113692), Fine Flourish
Stamp (115709), Sweet Pea Designer Series Paper Stack (117161), Chocolate Chip 5/8" Satin Ribbon (117287), I {Heart} Hearts Stamp Set ( wood mount 117010, Clear Mount 118571), Full Heart Punch (113693). The base of the card stock is cut 4 1/4" x 11 and then scored at 5 1/2" and 2 3/4" which will be the front of the card. After cutting out the heart shape we stamped the front panel with the Fine Flourish in Taken With Teal Classic Ink. We stamped the Friend heart
on Whisper White and punched it out with the Full Heart Punch then added it to the center of the card. The Satin Ribbon was tied around the heart opening and knotted. The inside was decorated with Whisper White and Sweet Pea Designer Series paper. Not a difficult card but one that makes people stop and wonder how you cut out just half of the hear. I really like that it has a non Valentine's feel and would be perfect to send to a friend that need a pick me up or just needs to know that you are thinking of them. This card would make a great workshop card as it is fun for beginner or advanced stampers. Call me if you would like to make this card at your workshop. Thanks for stopping by today and I hope that you stop by again, Tonya

Wednesday, January 13, 2010

Clear Mount

Hello, hello, hello! The sun is shining and it is great! Don't get me wrong the snow is pretty but the cold just makes you want to stay in and snuggle under a pile of blankets. I am happy to hear that warmer temperatures are headed our way. The cold weather also seems to have zapped my stamping mojo. I know I need to work on projects I just can't seem to get motivated to do so, but what better thing to make you really want to stamp but new stamps, accessories and Designer Series Paper. Yes, the Occasions Mini supplies have arrived at my house and I love them. The new Satin Ribbon is gorgeous, if you haven't gotten in on my Ribbon Share well what are you waiting for. The new punches are fun and easy to use and then there are the new Clear Mount Stamp Sets. I bought a few and all the Clear Mount Blocks and while I am not ready to completely change over to Clear Mount Blocks they are quite nice and easy to use. My only negative is that some of the tiny, tiny ones are hard to clean as they want to pop off my blocks. Maybe I just need to use a gentler touch. I really like the sentiments in clear mount and will definitely continue to buy them that way. Today's card is one that we are doing this week for our Stamp Club. It uses lots of new products and some free Sale-a-bration Designer Series Paper too. The love you much is from the new Well Scripted Clear Mount Stamp Set (118601). I have added a picture of the stamp on the Clear Block. This is Block C (118486). Other supplies used are Bermuda Bay Textured Card Stock (115719), Whisper White Card Stock (100730), Melon Mambo Card Stock (115320), Soft Suede Classic Ink Pad (115657), Welcome Neighbor Designer Series Paper Pad (118401), Pinking Hearts Border Punch (117649), Stampin'Up! Scalloped Heart of Hearts Emobsslits Die (117332), Pretty in Pink 5/8" Satin Ribbon (117289), Full Heart Punch (113693). All supplies can be purchase through my website and you can earn free Sale-a-bration product whether ordering online or directly through me. I hope you enjoyed today's project and if you have any questions be sure and leave me a comment. I am always happy to help and if you are interested in being a part of our Stamp Club then email me. We will be starting a new group next month. Until next time, Tonya