Just a quick reminder that today is the last day to order the Growth Chart. You can place your order online though my Business Website or give me a call and I will place your order for you. I have added a picture of the Growth Chart. This can be added to your wall or even a board so that you can move the chart when you move. What a great way to preserve a piece of your child's childhood.
Scroll down to the next post to see today's card. Thank you, Tonya
Wednesday, September 30, 2009
Birthday Card for Troops!
Good afternoon, as I told you yesterday, I have been busy designing cards for our Student Council to make on Saturday Oct. 3. If you would like to help in any way they would appreciate it.
Today's card features one of my favorite Designer Series Papers in the catalog.
Cottage Wall (115671) is a fun Designer Series Paper that combines Old Olive, Rich Razzleberry and Orchid Opulence. The base of the card is Orchid Opulence Card Stock (100969) and I have used the Flight Of the Butterfly Stamp Set (111564) to stamp small butterfly's and flowers on the top portion of the card. The bottom of the card is a layer of the Cottage Wall Designer Series Paper with the top edge Scalloped with the Scallop Edge Punch (112091). I added a small strip of Rich Razzleberry Card Stock (115316) to add a little extra detail to the card without adding a lot of dimension. The main image is three stamps all from the Flight of the Butterfly Stamp Set and were stamped in Old Olive (102272), Orchid Opulence (101859) and Rich Razzleberry (115658) Classic Ink. I used the Stamp-a-ma-jig to help get the stamps all lined up like I wanted them. I then added a layer of Old Olive Card Stock (100702) and used Dimensionals to attach it to the card. Tommorow I will share with you another card that we will be making on Saturday. Until then thank you for stopping by, Tonya
Tuesday, September 29, 2009
Clearance Rack
If you love a good sale then be sure and check out the online shopping on my Business Website. Stampin'Up! is offering Surplus Retired Inventory at up to 80% Off. These are available only while supplies last. There has never been a better time to check out the online ordering and as a extra bonus if you place an online order of $50 or more through my website I will give you your choice of one stamp from the Under $10 on page 208. I will email you after you place your order and find out what stamp you would like and then place the order. This offer will end on Friday so take a look at the Clearance Rack and earn a free stamp to. Also all orders of $150 or more will qualify for hostess benefits. Thank you for stopping by and if you have any questions please let me know. Tonya
Cards For Our Troops!
Good afternoon, I hope you enjoyed yesterday's Halloween projects. Today I am shifting gears and sharing some cards with you that will be going to some very special people. Before I get to the cards let me explain a little. Our school's Student Council does several service projects a year and this year they have decided to make cards for all occasions to send overseas for the Service members to have to send home to their families. The men and women that are currently serving our country unfortunately don't have a place to shop for cards so events like birthday's, anniversaries or Christmas can get missed.
The Student Council along with anyone that wants to come by and help will be making 200 cards October 3 from 10-1pm at our school gym. October 3 is also World Card Making Day so what a perfect day to help others and make cards. If you need directions please contact me privately and I will give you more info. Of course the more people we have come the faster the process will go. All card stock will be cut and ready to stamp and assemble just like at my classes. There is no fee to come and all cards will be sent over seas. We will also be adding postage to each card so that it is truly a gift to the Service Member that receives it.
We have been working with our local Air Guard and they are going to help us get the cards delivered. Even if you can only come a short time we would love to have you.
Now on to the card. I keep the layouts and embellishment simple so that they will mail well. The first card uses one of my favorite sets from the last catalog. Upsy Daisy (111710) is a fun set to use on several different techniques but for this card I just used second generation stamping to get the variation in color. The base of the card is Ruby Red Card Stock with a layer of Whisper White Card Stock. On the Whisper White layer I stamped the main image once with Ruby Red Classic Ink, then without reinking a stamped again, giving you a lighter tone of the Ruby Red. For the main focal point I again used Ruby Red Classic Ink but this time the image was stamped on Cameo Coral Card Stock them matted on Ruby Red Card Stock. The sentiment was stamped on Whisper White Card Stock them punched out with the Wide Oval Punch and since there are three sentiments in this stamp set we can vary them on the cards.
Tomorrow I will share with you one of the other cards we will be doing this weekend. Thank you for stopping by today, Tonya
Monday, September 28, 2009
Halloween Decor
Happy Monday morning to everyone! The weather is starting to feel more fall like which has made me want to get out my Halloween Decorations. So today's post focuses on Home Decor for the holiday's. All of these projects are simple and quick to make. The first project is a candy jar that I made last year and simply changed out the ribbon to a current color and set back out. The jar I found at a local retail store and after cleaning it well with a window cleaner I applied the large Spooky Spider Definitely Decorative (114763). This spider comes in three sizes and the large size is $14.95 in price. The ribbon around the top is Pumpkin Pie 1 1/4" Striped Grosgrain Ribbon (115616). You could also add the spider to a door, picture frame, wall or window. Just to name a few. This jar sets on our kitchen counter and I fill it with popcorn balls that my kids love to snack on.
The next two projects are just a simple. I used the Spooky Expressions Definitely Decorative (117568) which is a set of three jack-o-lantern faces for just $4.95 and added two of them to foam pumpkins. You can of course use real pumpkins but by using foam ones I can put them away and use them again for years to come. I do recommend cutting the individual parts of the face a part and adding the mouth and work your way up. Since the pumpkins are round and not smooth this help you to get the face to conform to the pumpkin at little easier and remember to rub the edges good.
So there you have two easy projects to decorate you home with for years to come. If you would like to see more of our Definitely Decorative line the catalog is available to view just click on the link to the left. You can order any of the Definitely Decorative items online or by contacting me. Thank you for stopping by and have a great day, Tonya
Thursday, September 24, 2009
Birthday Build A Bear
Good afternoon, I have had a busy morning and wasn't sure what I was actually going to post today then I remembered this Build A Bear Card that I made for a special birthday girl. She has already received the card so no worries that I will be giving her a sneak peak before the card arrives.
I think this set is so much fun and love how easy it is to design cards. They are fun to watercolor or as I have done in this card Paper Piece. The base of the card is Ballet Blue Card Stock (100613) and I used the new Pawsitively Prints Designer Series Paper (118060) both as the background layer and for my little girl bear's dress. This paper was designed for the Build A Bears and is a smaller scale which makes it perfect for making clothes for both the stamped images and the Stampin'Up! Bear for the Big Shot. I stamped the girl bear and her gift bag from the Beary Best Friends Stamp Set (118052) on Confetti White Card Stock (102028) in Basic Brown Ink (104315) and watercolored with the Aquapainter (103954) and Pretty in Pink (101301), Ballet Blue (100907) , Close to Cocoa (103139), and Creamy Caramel (103220) Classic Ink. I stamped the bear again on the Designer Series Paper and carefully cut out her dress and added it with Dimensionals. I used more dimensionals to the back and added it to the center of the card. Then I used Basic Brown Classic Ink again and stamped the Happy Bearthday from the Beary Nice Wishes (118050) on Confetti White Card Stock and layered it behind more Ballet Blue Card Stock attached it to the card and the card is finished.
I think this set would make great party favors just stamp the images and let the kids do the coloring! What child doesn't like to color and who can resist these cute images. Since both the Beary Nice Wishes and Beary Best Friends are available in the Holiday Mini they are only available until January 4, so if you would like to order yours be sure and contact me and we will get your order placed. You can also host a workshop and earn one item from the Holiday Mini at a discount. Contact me to set up a time for you and your friends to get together and stamp.
As always thank you for stopping by today. If you have any questions leave me a comment and I will be happy to get back to you. 'Til Next Time, Tonya
Wednesday, September 23, 2009
Shimmer Paint
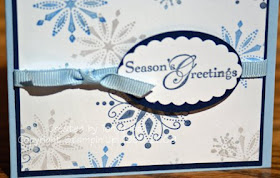
Good morning, I know that I was going to share with you another Halloween project but after playing with the new Shimmer Paint I just couldn't resist letting you see this card. Now the layout and design are very simple but I wanted it that way to show off the shimmer paint that I used through out this card. I am in love with all that this paint offers and I am sure that you will see more of it in upcoming projects. I took pictures of the same card at various angles trying to capture the shimmer of the snowflakes but nothing really does it justice except seeing it in real life. The base of the card is Bashful Blue Card Stock (105120) with a layer of Night of Navy Card Stock (100867). For the main image I used the Snow Swirl Stamp Set (111690), it was one of my favorites last year and still is this year. I just love the snow flakes. I inked up the larger snowflake with Night of Navy Classic Ink (102977) then used a Sponge Dauber 102892) to add Frost White Shimmer Paint (116854) directly over the Classic ink then stamped onto the Whisper White Card Stock (100730). I cleaned the stamp and repeated the process a couple of more times. Then used Ballet Blue (100907) and Bashful Blue (105209) on the other two snowflakes. I also stamped some snowflakes with just the Frost White Shimmer Paint on the stamp and no color. It added a transparent image that is quite pretty. You can see the shimmer better in the second picture at the left. I also added shimmer to the sentiment before I stamped it and punched it out with the Scallop Oval Punch (114889) and layered it on the Night of Navy Wide Oval Punch (112082) out. It is really hard to tell in the pictures but I also added White Frost Shimmer Paint to the Bashful Blue Grosgrain Ribbon (109029). The Paint can be used on fabrics and I just couldn't resist trying it. After I added it to the ribbon I just used my Heat Tool to speed up the drying process and heat set it.
I have so many ideas in mind for the new Shimmer Paint and since I purchased all three colors I will have to try them all. Would you like to try the new Shimmer Paint? It is available to purchase until January 4th. We will be using this at a future club meeting, I just need to decide if it will be a fall card or Christmas one. Hmm, something to think about. What do you think, Fall or Christmas?
Thank you for stopping by and have a great day, Tonya
Tuesday, September 22, 2009
Fancy Favors Halloween Style
Good morning, I have a few more Halloween items to share with you this week then I will move on to something else I promise. Today's box is very simple which if you have to make a lot of treat bags for classrooms or just trick or treaters you need something cute but easy. I used the Stampin' Up! Fancy Favor Big Shot Die (115965) to make the bag. It was cut out with Basic Black Card Stock. I also cut out the front piece of Cast-a-spell Designer Series Paper (115677) with the same Fancy Favor Die. This gives the top edge the same fancy scallop edge. The tag is made using the Holiday Best Hostess Stamp Set. You can earn your set just by placing an order of $150 or hostess a workshop with sales of $150. How easy is that. After coloring the stamp with Basic Black (109126), Pumpkin Pie (105115) and Old Olive (100079) Stampin' Write Markers I stamped it on Whisper White Card Stock (100730) and punched it out with the Scallop Oval Punch (114889) that is layered on a Wide Oval Punch (112082) made from Pumpkin Pie Card Stock (105117). I used Stampin' Dimensionals to attach the tag to the box and it is finished and ready to fill with yummy treats.
Let me know if you have any questions about today's post or any of my post I am always happy to help. Thank you for stopping by and have a great day. Tonya
Monday, September 21, 2009
Halloween Sweet Treat!
Good morning, I completely forgot to show you our club card from last week and since it uses some of our really cool new Sweet Treat Cups that are in the Holiday Mini, I didn't want to not share with you. The Sweet Treat Cups (116802) are perfect for adding a little extra special item to your cards and for only $2.95 for 12 cups they are really an affordable option. To make this card I started with a Pumpkin Pie Card Stock Base and then added a layer of Cast-a-Spell Designer Series Paper (115677) with a 5/8" piece of Basic Black Ribbon (115605) around the middle to the front of the card. I then stamped the Halloween image from the Sweet Centers Stamp Set (116521) on Whisper White Card Stock (100730) with Perfect Plum Classic Ink (101437). This stamp set matches the Sweet Treat Cups and has images for Christmas, Halloween, Valentine's Day, a flower and a hot air balloon. I can't wait to try one of the other ones. After stamping the image I used the 1 3/8" Circle Punch (104401) to punch out the center of the image, then the 1 3/4" Circle Punch (112004) to make the hole bigger and allow the cup to fit. Fill the cup with your treat and then remove the adhesive backing and add the Basic Black (102851) layer to hold the candy in. Add the stamped image around the sweet treat cup and using dimensional add to the front of the card. I used the Scallop Circle Punch (109043)and Pumpkin Pie Card Stock (105117)to finish up the sentiment at the top of the card. What a perfect card to send to a special friend.
Would you like to make your own Sweet Treat Cards? Contact me and I would be happy to help you with your cards. Thanks for stopping by and have a great day, Tonya
Saturday, September 19, 2009
Halloween Build A Bear
Good morning! Last night I had a workshop for one of my club ladies. She host a Halloween workshop every year for her and her friends and we always have a great time. Last night was certainly no exception! We laughed and just had a wonderful evening among friends. If you and your friends would like to get together for a fun and relaxing evening of stamping be sure and contact me. I provide all the supplies and just provide a light refreshment.
Of course with the new Build A Bear Dies I just couldn't resist doing a Halloween Project last night. We started by making the bag with the Bag with Scallops Bigz XL Die (114519). It was cut out in Basic Black 12 x12 Card Stock ( 106532). The great thing about this box is that the Big Shot does all the scoring for you making it super easy to make a lot of bags and make them quickly. We used sticky strip to add the sides to the bag and cut off the scallop top because I wanted to leave the bag open. Next we added a piece of Perfect Plum Designer Paper from the Cast-A-Spell Designer Series Paper (115677). I have been using this paper on several of the Halloween projects and I love the color combo of Perfect Plum, Old Olive, Pumpkin Pie, and Basic Black.
Watch for more projects this week. We then cut out our Build a Bear using Stampin'Up! Bear (117977) to make the body. I used Close to Cocoa Card Stock (101341) for his body and Creamy Caramel (102514) for his muzzle. A piece of Chocolate Chip Card Stock (102128) was placed behind the face to add color to his eyes, nose and mouth. The easiest way to do this is just punch out a circle of card stock with the 1" Circle Punch (109046). We used Pumpkin Pie Card Stock (105117) to make the pumpkin costume and Basic Black Card Stock (102851) to make his mask. Again a 1 3/4" Circle (112004) of Basic Black Card Stock was placed behind the jack-o-lanterns face to add color. The die we used to cut out the costume is Stampin'Up! Kooky Spooky (117979) and also includes a witch's hat and broom. After using 2 Way Glue (100425) to add the part to our Bear we used dimensionals to add it to the front of the bag. Wouldn't these be great party treats for a classroom or even for those extra special trick or treaters you might have stop by. All items are available to purchase from me just click on the My Business Website at the top left of the page. Thank you for stopping by today and be sure and check back for more Halloween projects. 'Til Next Time, Tonya
Wednesday, September 16, 2009
My Digital Studio Halloween Pages
Good evening, everyone. Busy day today with lots of activities going on but I wanted to post a quick couple of pages before I went to bed. Both of these pages were made using the My Digital Studio. Now the pictures were taken five years ago when we lived out state. I did these using my old film SLR but also had a disk made and they were on my computer. With a few clicks of the mouse I have these pages. I just added items and changed things around until I was happy with the results. One really neat feature of the My Digital Studio is the ability to make stamped images larger or smaller. Take the spider at the top of the first page as an example, I made it larger and the hat smaller to fit on my letter.
I have also started making pages with my Daughter's gymnastics picture. I hope to make a complete book from last season for her. I have three pages complete and will share some of those at a later date. I will probably play around with these to pages some more before I finally print them but I must tell you that I am finding My Digital Studio to be quite fun and addictive. Remember that on Oct. 1st you can order your own copy or you can even get it at a discount. Contact me to find out more about the special. Thanks, for stopping by tonight and as always if you have any questions I would be happy to help you, Tonya
Tuesday, September 15, 2009
No Big Shot Required Part 2
Happy Tuesday! I am back today with more projects that don't require the Big Shot to make. Today's projects are again ones that I learned from my upline before I became a demonstrator. Thanks, Amy! The first treat container are the triangle ones shown at the right. To make these you need a piece of card stock 4 1/4" x 11" scored at 5 1/2", then mark the edges of the 4 1/4" side in the middle. Score from the middle mark to the outside edge of the center score line making a triangle, repeat on the other three sides. Below is a picture of what your card stock will look like after scoring.
The next step is to add ribbon at the top to hold all your candy inside and then decorate. I used the Hostess set Holiday Best (115364) which is a level one and available for free just for buying $150 or hosting a workshop that totals $150 in merchandise sales. I inked up the image with the Pumpkin Pie, Basic Black and Old Olive Stampin' Write Markers then punched the image out with the Scallop Oval Punch and layered it on the Wide Oval Punch. On one of the treat triangles I used Cast-A-Spell Designer Series Paper and on the other I randomly stamped Jack-o-lanterns from the Family Accessories Stamp
Set (113494).
The second project for today is called a Sour Cream Container as it looks like the sour cream containers you sometimes get at restaurants. I love making these as they are very easy and require no scoring. I made two different sizes but the size I prefer is 5 1/2x 8 1/2 which is half a sheet of card stock. The Perfect Plum Container is made with those measurements. Before making the container I randomly stamped candy corn and other candy from Tasty Sweet Stamp Set (111698) with Versamark. Versamark is a great first ink as it gives you a darker image or watermark on any color of card stock. After stamping I used the 1 3/4" Circle Punch and punched out a window and added a piece of Window Sheet with Sticky Strip. On the short side add Sticky Strip and attach it to the other short side giving you a tube. Pinch the bottom edges together to make a flat bottom. Add Sticky Strip inside to seal it shut. I also crimped the bottom edge to give it a more finished look. Fill with goodies, but not to full as it is hard to close if the container is to full. Pinch the top edges in the opposite direction of the bottom. With the Crop-a-dile punch two hole along the top, add ribbon and tie shut. I added a tag made from the Eat, Drink & Be Scary Stamp Set (111764) and the container is finished.
The other Sour Cream Container was made using the polka-a-dot Window Sheet from the new Night & Day Designer Series Specialty Paper. I added a scallop edge along the bottom to help hide the sticky strip and used the Halloween Definition from the Eat, Drink & Be Scary Stamp Set.
If you have any questions about today's containers please let me know. Tomorrow I will be back with a Treat Container that does use the Big Shot that I made a while back and forgot to post. Thank you for stopping by and have a great day, Tonya
Monday, September 14, 2009
No Big Shot Required!
Happy Monday Morning! I hope that you all had a great weekend! Last week I shared with you a couple of treat containers that required the use of the Big Shot Die Cut Machine and while I will be the first to admit that I love my Big Shot I also realize that not all of you have one. (Let me know if you are interested in seeing how it works ;) , back to today's post sorry. For the next two days I will be sharing treat containers that do not require the Big Shot to make. These are by no means original ideas they have been around for as long as I have been stamping and that is a while. I will give you measurements and scoring instructions so you can also make these simple treat containers for all the spooks and goblins in your life.
The first project is a box with a flap closure commonly called a 2-5-7-10 box. Why you may ask well it is simply because it is scored at those measurements. You will need a 8 1/2 x 11 sheet of card stock. For this project I used Pumpkin Pie Card Stock (105117). On the 11" side you score at the 2", 5", 7", and 10" measurements then turn the card stock and score at the 1 1/2" and 6 1/2" measurements.
I have supplied you with a diagram of the box to help you understand my instructions for the next few steps. After scoring you will cut off the areas shown in white on my diagram. Leaving you with just what I have in orange. The score lines that go across the bottom will need to be cut up to the next score line to create the bottom flaps. Fold along all score lines and if you would like you can scallop the flap which is the only piece left on the top of the box. I scalloped the flap with the Scallop Edge Punch (112091). You can also stamp on your box before you assemble it. Place Sticky Strip (104294) on the 1" piece shown on the right side of my diagram. Fold the box and place the 1" flap inside the box attaching it to the other edge. This will form your box. Next fold the two short side edges into the bottom of the box and place Sticky Strip (104294) onto one of the two long Flaps, fold the one without Sticky Strip (104294) in then the one with the Sticky Strip(104294) to finish the bottom of your box. The box is now ready to decorate. I used the Halloween Hoot Stamp Set (111582) and colored the Witch with Basic Black (109126), Old Olive (100079), Perfect Plum (100035) Stampin'Write Markers before stamping her on Confetti White Card Stock (102028). I then masked the Witch and Stamped her sign with Chocolate Chip (100908) and Pumpkin Pie Classic Ink (105216). The Moon was stamped off once then stamped onto the card stock with Summer Sun Classic Ink (100537). The whole thing was layered on Basic Black Card Stock (102851) and I used the Crop-a-Dile (108362) to add hole in the flap and the front of the box and used 5/8" Basic Black Grosgrain Ribbon (115605) to tie the box shut.
The next project is a little smaller. It is also a scored box but instead of closing at the top it is left open. I started with a 5 1/2 x 8 1/2" sheet of Perfect Plum Card Stock (101889) and scored it at 2",4", 6" and 8" on the 8 1/2" side, along the 5 1/2" side I scored at 2". Cut on the 2", 4", 6" and 8" score lines up to the 2" line making the flaps for bottom of the box. The box will be about 3 1/2" tall. If you would like to scallop the top edge of the box you will need to do so before you fold the box up. Cut off the top and bottom extra flaps on the 1/2" side similar to the box above. Add Sticky Strip (104294) to the 1/2" flap and secure it to the other edge of the box. Fold the bottom flaps in and use Sticky Strip (104294) to hold the box together. I again used the Halloween Hoot Stamp Set and the Stampin'Write Markers to ink up the Frog and I couldn't resist using the Free Kisses Stamp that comes with the set. Inside the box is a Small Flat Cellophane Bag (103104) with what else but Hershey's Kisses of course. I tied the bag shut with 1/4 " Basic Black Grosgrain Ribbon (109027).
Now you have the directions to make two treat containers that don't require the Big Shot. Tomorrow I will show you two other treat containers that are even easier to make. If you have any questions please email me and I will be happy to help. Thank you for stopping by today and have a great day, Tonya
Friday, September 11, 2009
Branching Out
Good afternoon, today's card is my attempt to use the stamp sets that I currently have to make Halloween cards and the Branching Out Stamp Set (which is on the dormant list but still available) is one that is perfect for many occassions. I started by cutting out a Whisper White Top Note with the Big Shot (113439)and Top Note Die (113463). I then embossed the Tree with Black Embossing Powder (109133) . I added a moon by punching out a circle with the 1 3/8" Circle Punch (104401) and using the negative image I sponged Summer Sun (100537) and Pumpkin Pie (105216) Classic Ink. I used the punched out circle and masked the moon and sponged Ruby Red (102259), Pumpkin Pie (105216), Summer Sun (100537) and Really Rust (102549)Classic Ink across the Top Note to add a sunset apperance. I also added a little Basic Black Classic Ink (101179) to tone down the other colors. The bat and sentiment ( from the Scary Skeleton Stamp Set 113224) were stamped with Stazon Jet Black Ink (101406). The sentiment was punched out with the Small Oval Punch (107304) then sponged before adding it to the card. The base of the card is Basic Black Card Stock (102851) and was texturized with the Texture Plates Kit #4 (114531) before the Top Note was added. There you have it the finished card. Not complicated at all. If you would like to order the supplies to make this card or would like to host a workshop to learn how to make this card contact me. I would love to help you! Thank you for stopping by today and have a great weekend, Tonya
New Header
Just a super quick post to let you know that I have updated my header and I did it with My Digital Studio! I love this program and have been having so much fun with it. Now while the header isn't perfect I do love how easy it is to customize and change whenever I want. Leave me a comment on what you think you would use the new My Digital Studio for. I would love to hear your ideas! I will be back later with a stamped project, right now I am off to volunteer at my kids' school. Thanks, Tonya
My Digital Studio!!
Well, I received my copy of My Digital Studio and while I really tried to wait and not play with it until the weekend I gave in and started playing with it tonight. I have created several pages using the predesigned layouts that are on the program and even made a few modifications of my own but I have not tired making my own page from scratch. I will give that I try this weekend however. I thought I would share I few of the pages I put together using last years Christmas pictures. I kept these pages pretty simple but as I look at them I want to add a few embellishments and change a few things and with My Digital Studio I can do just that. Remember that you can buy your copy of My Digital Studio on Oct. 1. I will give the calendar
What do you think of the Scrapbook pages so far? I am excited to hear from you and if you have questions please leave me a comment and I will be happy to answer them. I will post more pages as I finish them but I also have some other projects to share. Well, I had better get to bed as it is getting quite late. Just had to share before I did though. Thank you for stopping by, Tonya
Wednesday, September 9, 2009
Simple Skeleton!
Good afternoon, thank you for stopping in today. I have moved back to Halloween projects after spending time doing Christmas cards and while looking through one of my magazines I noticed a simple Halloween card that made me stop and take a closer look. Now the card was very simple which usually isn't my prefered style but I decided I wanted to use the layout and make my own card using just Stampin'Up! supplies. After all that is what I love! The result was this card. I should have added a glue dot before taking the picture so the button doesn't look to heavy but I do love the way the card turned out. It was a quick card and very easy to make. I used the skeleton from the Scary Skeleton Stamp Set (113244) which is a great buy for only $13.95. The skeleton was inked up with Jet Black Stazon Ink Pad (101406) then below the skeleton I inked up Happy Halloween from the All Holidays Stamp Set (114916) in Perfect Plum Classic Ink (101437). I mounted the Very Vanilla Card Stock (101650) on a layer of Basic Black Card Stock (102851) then I added Old Olive 1 1/4" Striped Grosgrain Ribbon (115618) around the two layers and SNAILed it to the back. I used Natural Hemp Twine (100982) to tie a Pumpkin Pie Corduroy Button (114342) around the ribbon. I adhered this to the Pumpkin Pie Card Stock (105117) Base and the card is finished. You could quickly make several of these for all of your friends and family for Halloween. Yesterday was a productive day for me as I finished three cards and a Halloween treat box which I will show you over the next few days. I am off to do some more creating. 'Til next time, Tonya
Tuesday, September 8, 2009
Chocolate!
Hope you all had a great weekend! I know that we enjoyed ours and got to spend a lot of time with our family. Saturday we had a wedding for a cousin of mine that I used to babysit when he was a new born. They had a beautiful wedding, reception and dance which my kids had a blast dancing at. Now whenever I get a wedding invite I always try and use the colors, design or some other element from the invite on their card. Today's card is really no different. I started with a 4 1/4" x 12" piece of Textured Chocolate Chip Card Stock (108697) and scored it at 1", 3 3/4" and 9 1/4" this gave my card a center opening and a pocket inside to put the gift card that I was giving them. Because the pocket wasn't very deep or pretty I added a strip of Very Vanilla Card Stock (101650) that I punched out with the Eyelet Border Punch (113692). I also added a 4" x 5 1/4" piece of Very Vanilla Card Stock (101650) that I embossed with the Stampin'Up! Elegant Bouquet Textured
Impressions Embossing Folder (115964). The sentiment is from the Heard from the Heart Stamp Set (111644) and is stamped in Chocolate Chip Classic Ink (100908) with the Stamp-a-ma-jig (101049). With the inside complete I moved to the outside of the card.
For the outside I again used the Elegant Bouquet Embossing Folder but before I embossed it with the Big Shot I used my Brayer (102395) and Chocolate Chip Classic Ink (100908) and covered with inside of the emboss folder with the ink. I then added my Very Vanilla Card Stock and embossed the image. By inking up the folder with the Classic Ink all of the embossed images stayed Very Vanilla and every thing else became Chocolate Chip.
I then cut the embossed card stock in half and put each half onto the Very Vanilla Card Stock and added it to each front panel of the card. I also like to add something from each wedding invite to the card itself and in this case it was the ribbon. The chocolate chip ribbon that I used to hold the card closed is actually taken off of the bride and groom's invite they sent us. I love how it looks on this card but of course there are Stampin'Up! ribbon that would also look great. To finish off the card front I stamped For the Newlyweds from the Teeny Tiny Wishes Stamp set (115370) and punched it out with the Scallop Oval Punch (114889). Not a complex card but an elegant one that I hope the special couple enjoy.
I am anxious to try more of the embossing and brayering possibly with the new Stampin'Up! Textured Impressions Folder Petals-A-Plenty (116824) that can be found in the new Holiday Mini!
Just a quick reminder that club will be next Tuesday at 7:30 pm for those of you attending club. If you are interested in finding out more about my stamp club be sure and contact me. I will be happy to answer any questions you might have. Have a great day and thank you for stopping by, Tonya
Monday, September 7, 2009
Birthday Star!
Hello, it is Labor Day and we are spending the day visiting my Grandma and many other family members including the newest member that is just one month old. This will be our first visit with the new baby and we are looking forward to it! Today I am sharing with you the birthday card I made for my 8 year old. His birthday was Friday and after I gave him the card I had to take it back to get the picture. This card was completely inspired by the wrapping paper that I bought for his gifts. The paper was a light blue with various sized stars in red, yellow, white, green and blue. I knew that I want to use the Stampin'Up! Movers & Shapers Curly Label Die (114506) and the Star from the Stampin'Up! Punch Window Dies (115953). I started with a base of Summer Sun Card Stock (103124) and added a layer of Bashful Blue Card Stock (105120) before I cut out the star. In hindsight I should have done them separately because I lost some of the Summer Sun on the bottom of the card when it was cut and scored, but lesson learned. After the star window was cut out I stamped the Happy Birthday from the Family Phrases Stamp Set (114960) in Brilliant Blue Classic Ink (100691) on the bottom front. Then I just used the Star Punch (109045)and the Large Star Punch (110710) to punch out stars in Whisper White (100730), Real Red Textured (108698), Brilliant Blue (100721), Old Olive (100702) and Summer Sun (103124) Card Stock and added them to the card with Dimensionals and Tombow. The Real Red Star in the Center is actually inside the card and was placed inside the window. Inside the card I just hand wrote with Brilliant Blue Stampin'Write Marker (100057) "You're A Star". The birthday boy liked his card which means mom did good!
Have a great day and tomorrow I will be back with a wedding card that I made for this weekend's wedding that we attended. 'Til next time, Tonya
Friday, September 4, 2009
Serene Snowflakes
Good morning! The weather cleared off enough for me to get a okay picture of the card I wanted to share today. This will be a quick post because we have a birthday in our house today and I need to finish getting ready for our birthday boy's celebration tonight including having a friend over. The colors for today's card are Soft Suede and Real Red. This color combo is used in the new Christmas Cocoa Speciality Designer Series Paper (116770) but since I don't have that paper I decided to use the Merry Moments Designer Series Paper (115672). The base is Soft Suede Card Stock (115318). I stamped the largest snowflake from the new Serene Snowflakes Stamp Set (115438) in Real Red Classic Ink (103133) on Very Vanilla Card Stock (100730) after mounting the Very Vanilla Card Stock on a layer of Soft Suede Card Stock (115318) I added a Square Fire Rhinestone Brad (109112) in the center. The sentiment is from the Warm Words Stamp Set (115108) and is also stamped in Real Red Classic Ink on Very Vanilla Card Stock. I punched it out with the Large Oval Punch (107305) and used dimensionals to attach it to the card. There you have my simple Christmas Card. I want to try another card with this set using Silver and Blues but that will have to wait for another day! Have a great Labor Day weekend! I hope you get to spend it with family and friends. That is what I plan on doing. 'Til next time, Tonya
Thursday, September 3, 2009
More Christmas!
Good evening, I have had one of those busy weeks that leaves you running from one thing to another and not getting to everything on my list. I am sure that you have all had those weeks. I do have a new stamp set I would like to show you but I haven't had a chance to take the picture of the card yet and since today is a little cloudy I will give it a try tomorrow. So for today I will share the remaining projects that we made at convention. I love these Treat boxes (115690)! They are only $3.95 and you get five per package, they are the perfect size for a few Christmas cookies or other treat that you might share with a neighbor or coworker. They are coated and food safe. We made a tag using the Sweet Season Stamp Set (116471) The sentiment reads "gingerbread & sugared things- enjoy the sweets the season bring." The Ribbon is Real Red 3/4" Polka-Dot Grosgrain Ribbon (115608)
The next two projects also use the same stamp set. The first is a Garden Green Card that opens in the center and has a band that slides off to reveal the inside. It also uses the Scallop Circle Punch (109043) which fits perfectly the snowflake stamp in the set. We also used Merry Moments Designer Series Paper (115672) and the same ribbon as above. We stamped the front of the envelope which you can see in the picture to give the card a more finished look.
The last group of projects is four tags made using the new Stampin'Up! Two Tags Bigz Die(115954). You get one of each size on the die. We used the Sweet Season Stamp Set and a little more Merry Moments Designer Series Paper (115672). We also used Old Olive 1/4" Grosgrain Ribbon (111368)and the Wide Oval (112082), Large Oval (107305) and Scallop Circle Punch (109043).
The tags were super quick to make and the long tag would also make a great bookmark. One of my roommates at convention used the folded tag to make us all tags for our convention bags that listed inside if found please call. This was a great idea, thankfully we didn't need the info. but it is better to be safe than sorry.
Tomorrow I will be back with a new card made with a stamp set from the Holiday Mini. Thank you for stopping by today and if you would like to purchase the supplies to make these great projects remember it is as easy as shopping at my online store or giving me a call. 'Til tomorrow, Tonya
Tuesday, September 1, 2009
Holiday Mini Start Today!
The new Holiday Mini starts today and I know that many of you that order from me have not received it yet, do to some mailing issues but please know that it is coming. Until it arrives I wanted to provide you with a link to view it online. I have update by sidebar with the new link. If you have any questions about the mini please contact me and I will be happy to help you.
Yesterday I mentioned the Hostess Special that starts today and will continue until the end of November. You may have noticed that I mentioned that My Digital Studio would not be available to purchase and I was unsure when it would be available, well Stampin'Up! made the announcement today that it is available for Demonstrators to purchase starting today and everyone else can purchase it after October 1. I am so excited to try this new area of scrapbooking and the idea of incorporating our Stampin'Up! colors, stamp set and even Designer Series Paper makes this new product even more exciting. I will be making some samples to show you as soon as I receive my copy. Stampin'Up! has also contracted with a Professional Printing Service to print any items you would like to make. While this offers you a professionally made product it also insure that the printed items will offer the same great color matching that Stampin'Up! strives so hard to maintain. Stampin'Up! has worked with the printing service to insure that their machines are calibrated to offer you our wonderful colors. I hope you give My Digital Studio a try in October.
I have a busy day today but I am going to try and post a new project for you later today. This week is Student Council Elections for two of my four kids which has meant late nights making campaign posters and getting ready for speeches. Have a great day and take a moment to look through the mini and let me know what your favorite new items it! I would love to have your feedback. Thanks, Tonya